가시다님이 진행하시는 ci/cd 스터디 3주차 주제인 jenkins와 argocd에 대해서 알아보겠습니다.
이번 실습에서는 모든 환경을 Kubernetes에서 진행하고 Github Repo를 연동해서 진행합니다.
실습환경 구성
클러스터 구성
우선, 테스트를 위한 k8s 클러스터 환경을 구성합니다. 이번에는 control-plane, worker 두 개의 node를 띄웠기에 확인해줍니다.
kind create cluster --name myk8s --image kindest/node:v1.32.8 --config - <<EOF
kind: Cluster
apiVersion: kind.x-k8s.io/v1alpha4
networking:
  apiServerAddress: "0.0.0.0"
nodes:
- role: control-plane
  extraPortMappings:
  - containerPort: 30000
    hostPort: 30000
  - containerPort: 30001
    hostPort: 30001
  - containerPort: 30002
    hostPort: 30002
  - containerPort: 30003
    hostPort: 30003
- role: worker
EOF

# 두 개의 노드가 떴는지 확인
kind get nodes --name myk8s
myk8s-control-plane
myk8s-worker
Github 구성
CI/CD 를 위한 Github 연동을 하기위해 아래의 사항을 진행한다.
- https://github.com/settings/tokens 에 접속하여 아래와 같이 권한을 부여해주고 토큰을 생성한다.

토큰정보 저장한다. - 아래의 private repository 생성
- New Repository 1 : 개발팀용
- Repository Name : dev-app
- Choose visibility : Private ← 선택
- .gitignore : Python
- Readme : Default → (Check) initialize this repository with selected files and template
- ⇒ Create Repository 클릭 : Repo 주소 확인
- New Repository 2 : 데브옵스팀용
- Repository Name : ops-deploy
- Choose visibility : Private ← 선택
- .gitignore : Python
- Readme : Default → (Check) initialize this repository with selected files and template
- ⇒ Create Repository 클릭 : Repo 주소 확인
- New Repository 1 : 개발팀용
Github 저장소 구성
TOKEN=*<생성한 Github 토큰>*

git clone https://git:$TOKEN@github.com/*<자신의 Github 계정>*/dev-app.git
cd dev-app
git --no-pager config --local --list
git config --local user.name "devops"
git config --local user.email "a@a.com"
git config --local init.defaultBranch main
git config --local credential.helper store
git --no-pager config --local --list
cat .git/config
git --no-pager branch
git remote -v

# 서버코드 작성
cat > server.py <<EOF
**from http.server import ThreadingHTTPServer, BaseHTTPRequestHandler
from datetime import datetime
import socket

class RequestHandler(BaseHTTPRequestHandler):
    def do_GET(self):
        match self.path:
            case '/':
                now = datetime.now()
                hostname = socket.gethostname()
                response_string = now.strftime("The time is %-I:%M:%S %p, VERSION 0.0.1\n")
                response_string += f"Server hostname: {hostname}\n"
                self.respond_with(200, response_string)
            case '/healthz':
                self.respond_with(200, "Healthy")
            case _:
                self.respond_with(404, "Not Found")

    def respond_with(self, status_code: int, content: str) -> None:
        self.send_response(status_code)
        self.send_header('Content-type', 'text/plain')
        self.end_headers()
        self.wfile.write(bytes(content, "utf-8"))

def startServer():
    try:
        server = ThreadingHTTPServer(('', 80), RequestHandler)
        print("Listening on " + ":".join(map(str, server.server_address)))
        server.serve_forever()
    except KeyboardInterrupt:
        server.shutdown()

if __name__== "__main__":
    startServer()
EOF

# Dockerfile 생성
cat > Dockerfile <<EOF
FROM python:3.12
ENV PYTHONUNBUFFERED 1
COPY . /app
WORKDIR /app
CMD python3 server.py
EOF

# VERSION 파일 생성
echo "0.0.1" > VERSION

tree
git status
.
├── Dockerfile
├── README.md
├── server.py
└── VERSION

1 directory, 4 files
On branch main
Your branch is up to date with 'origin/main'.

Untracked files:
  (use "git add <file>..." to include in what will be committed)
    Dockerfile
    VERSION
    server.py

# push
git add .
git commit -m "Add dev-app"
git push -u origin main
Docker Hub 구성
docker hub에서 회원가입을 하고 아래의 두 가지를 생성한다
- pat 토큰 만들기

settings > personal token > pat 토큰 생성: 토큰이 dckr_pat_xxx 로 생성한 토큰을 발급한다. - private repository 만들기
dev-app로 된 private repository를 생성한다.
토큰 정보를 저장한다.
Jenkins 구성
docker로 구성 펼치기
jenkins를 사용하기 위해 DooD(Docker out of Docker)를 사용한다. 아래의 방식으로 진행된다.
  - jenkins을 docker로 구성
  - jenkins 내에서 docker를 사용하기 위해 노트북의 docker.sock를 jenkins 도커내에서 공유하여 사용
  - jenkins 계정에 docker group을 만들고 docker.sock에 대한 접근 권한 부여하여 docker.sock 을 공유함
  - jenkins url을 노트북의 ip로 설정하여 kind로 구성된 클러스터에서도 접근가능하도록 함

  **DinD**

  - DinD는 컨테이너 내부에서 별도의 Docker 데몬을 실행하는 방식.
  - 컨테이너 안에 own dockerd 가 있고, 그 위에서 또 컨테이너를 실행 가능
  - 도커 위에 도커를 설치하는 방식이라 비효율적
  - 예: docker run --privileged --name docker-daemon -d docker:dind 처럼 컨테이너에 --privileged 옵션 주고 docker:dind 이미지를 실행하는 방식

  **DooD**

  - DooD는 컨테이너 내부에서 호스트의 Docker 데몬(소켓)을 직접 사용 하는 방식
  - 별도의 dockerd 를 내부에 실행하지 않고 /var/run/docker.sock 등을 마운트해서 호스트의 Docker 엔진을 공유하는 것
  - 예: docker run -v /var/run/docker.sock:/var/run/docker.sock docker 같은 방식

  ```bash
  # 작업 디렉토리 생성 후 이동
  mkdir cicd-labs
  cd cicd-labs

  # jenkins docker-compose 만들기
  cat <<EOT > docker-compose.yaml
  services:

    jenkins:
      container_name: jenkins
      image: jenkins/jenkins
      restart: unless-stopped
      networks:
        - cicd-network
      ports:
        - "8080:8080"
        - "50000:50000"                      *# Jenkins Agent - Controller : JNLP*
      volumes:
        - /var/run/docker.sock:/var/run/docker.sock
        - ./jenkins_home:/var/jenkins_home   # (방안1) 권한등으로 실패 시 ./ 제거하여 도커 볼륨으로 사용 (방안2)
  volumes:
    jenkins_home:
  networks:
    cicd-network:
      driver: bridge
  EOT

  # 배포
  docker compose up -d
  docker compose ps

  ## (방안1) 호스트 mount 볼륨 공유 사용 시
  tree jenkins_home

  ## (방안2) 도커 불륨 사용 시
  docker compose volumes

  # 도커를 이용하여 컨테이너 접속
  docker compose exec jenkins bash

  # Jenkins 초기 암호 확인
  docker compose exec jenkins cat /var/jenkins_home/secrets/initialAdminPassword
  d92460ef6b0241cea3ac7bf8e1e6db9e

  # Jenkins 웹 접속 주소 확인 : 계정 / 암호 입력 >> admin / qwe123
  open "http://127.0.0.1:8080" # macOS
  # 아래의 과정을 진행
  ## 접속하게 되면 Unlock Jenkins 화면이 나오는데 Jenkins 초기 암호인 d92460ef6b0241cea3ac7bf8e1e6db9e 를 입력
  ## install sugestion plugin 옵션을 선택해서 설치
  ## 유저정보 설정에서 username: admin, password: qwe123 를 설정
  ## ip는 네트워크 통신을 위해서 127.0.0.1 이 아닌 pc의 아이피인 192.168.0.25 와 같은 형태의 아이피를 입력
  ## kind에서 127.0.0.1은 파드 내부이기에 jenkins 접근 불가능

  # docker out of docker 설정하기
  # Jenkins 컨테이너 내부에 도커 실행 파일 설치
  docker compose exec --privileged -u root jenkins bash
  -----------------------------------------------------
  id
  uid=0(root) gid=0(root) groups=0(root)

  # Install docker-ce-cli
  curl -fsSL https://download.docker.com/linux/debian/gpg -o /etc/apt/keyrings/docker.asc
  chmod a+r /etc/apt/keyrings/docker.asc
  echo \
    "deb [arch=$(dpkg --print-architecture) signed-by=/etc/apt/keyrings/docker.asc] https://download.docker.com/linux/debian \
    $(. /etc/os-release && echo "$VERSION_CODENAME") stable" | \
    tee /etc/apt/sources.list.d/docker.list > /dev/null
  apt-get update && apt install docker-ce-cli curl tree jq yq wget -y

  # docker images를 하면 실제 로컬에 있는 docker image를 조회할 수 있음. -> 도커 소켓을 공유하기 때문
  docker images
  REPOSITORY                                                               TAG                       IMAGE ID       CREATED        SIZE
  jenkins/jenkins                                                          latest                    febe17543e42   25 hours ago   836MB        753ac3728749   7 weeks ago    1.12GB
  kindest/node                                                             v1.32.8                   abd489f042d2   2 months ago   1.51GB

  # Jenkins 컨테이너 내부에서 root가 아닌 jenkins 유저도 docker를 실행할 수 있도록 권한을 부여
  # docker group을 만들고 실제 local host의 docker.sock에 접근 권한을 부여하여 jenkins 계정을 docker group 에 할당하여 jenkins에서도 접근가능하도록 함
  groupadd -g 2000 -f docker
  chgrp docker /var/run/docker.sock
  ls -l /var/run/docker.sock
  usermod -aG docker jenkins
  cat /etc/group | grep docker

  exit
  --------------------------------------------

  # jenkins item 실행 시 docker 명령 실행 권한 에러 발생 : Jenkins 컨테이너 재기동으로 위 설정 내용을 Jenkins app 에도 적용 필요
  ~~~~docker compose restart jenkins
  ~~~~
  # jenkins user로 docker 명령 실행 확인 -> 동일한 것을 확인
  docker compose exec jenkins id
  uid=1000(jenkins) gid=1000(jenkins) groups=1000(jenkins),2000(docker)
  docker compose exec jenkins docker images
  REPOSITORY                                                               TAG                       IMAGE ID       CREATED        SIZE
  jenkins/jenkins                                                          latest
  kindest/node                                                             v1.32.8                   abd489f042d2   2 months ago   1.51GB        febe17543e42   25 hours ago   836MB
  docker compose exec jenkins docker ps
  CONTAINER ID   IMAGE                  COMMAND                  CREATED          STATUS          PORTS                                                                                          NAMES
  cb897d0af891   jenkins/jenkins        "/usr/bin/tini -- /u…"   15 minutes ago   Up 36 seconds   0.0.0.0:8080->8080/tcp, [::]:8080->8080/tcp, 0.0.0.0:50000->50000/tcp, [::]:50000->50000/tcp   jenkins
  a83a587d1b8b   kindest/node:v1.32.8   "/usr/local/bin/entr…"   36 minutes ago   Up 36 minutes   0.0.0.0:30000-30003->30000-30003/tcp, 0.0.0.0:60152->6443/tcp                                  myk8s-control-plane
  77e22ccb9461   kindest/node:v1.32.8   "/usr/local/bin/entr…"   36 minutes ago   Up 36 minutes                                                                                                  myk8s-worker
도전과제1: Jenkins 를 K8S 에 설치
이번 실습에서는 Jenkins를 kubernetes에 설치하여 실습을 진행한다.
helm repo add jenkins https://charts.jenkins.io
helm repo update

# jenkins namespace 만들기
k create namespace jenkins

# jenkins-service-account.yaml 만들기
cat <<EOT > jenkins-service-account.yaml
apiVersion: v1
kind: ServiceAccount
metadata:
  name: jenkins
  namespace: jenkins
---
apiVersion: rbac.authorization.k8s.io/v1
kind: Role
metadata:
  name: jenkins
  namespace: jenkins
rules:
- apiGroups: [""]
  resources: ["pods"]
  verbs: ["create","delete","get","list","patch","update","watch"]
- apiGroups: [""]
  resources: ["pods/exec"]
  verbs: ["create","get","list"]
- apiGroups: [""]
  resources: ["pods/log"]
  verbs: ["get","list","watch"]
- apiGroups: [""]
  resources: ["pods/status"]
  verbs: ["get","list","watch"]
- apiGroups: [""]
  resources: ["events"]
  verbs: ["watch"]
---
apiVersion: rbac.authorization.k8s.io/v1
kind: RoleBinding
metadata:
  name: jenkins
  namespace: jenkins
roleRef:
  apiGroup: rbac.authorization.k8s.io
  kind: Role
  name: jenkins
subjects:
- kind: ServiceAccount
  name: jenkins
  namespace: jenkins
EOT

k apply -f jenkins-service-account.yaml

# jenkins-values.yaml 만들기
cat <<EOT > jenkins-values.yaml
controller:
  serviceType: NodePort
  servicePort: 80
  nodePort: 30000
  jenkinsUriPrefix: "/jenkins"
  serviceAccount:
    create: false
    name: jenkins
  installPlugins:
    # Kubernetes
    - kubernetes:latest
    - kubernetes-cli:latest

    # GitHub
    - github:latest
    - github-branch-source:latest
    - github-api:latest
    - pipeline-github-lib:latest

    # Pipeline
    - workflow-aggregator:latest
    - pipeline-stage-view:latest

    # Git
    - git:latest
    - git-client:latest

    # Credentials
    - credentials:latest
    - credentials-binding:latest

    # 기타 유틸
    - configuration-as-code:latest
    - timestamper:latest
    - ansicolor:latest
    - junit:latest
  resources:
    requests:
      cpu: "500m"
      memory: "2Gi"
    limits:
      cpu: "2000m"
      memory: "4Gi"
  persistence:
    enabled: true
    size: 50Gi
EOT

helm install jenkins jenkins/jenkins -n jenkins -f jenkins-values.yaml

# 비밀번호 확인
kubectl exec --namespace jenkins -it svc/jenkins -c jenkins -- /bin/cat /run/secrets/additional/chart-admin-password && echo
U5rwZdPmDr6Za1Y7yCdeWz

# jenlins 접속
open http://localhost:30000/jenkins
Jenkins로 CI 하기
Jenkins Credential 설정(도전과제2 Github Private Repo 연동)
http://localhost:30000/jenkins/manage/credentials/store/system/domain/_/ 접속해서 Add Credential 버튼을 클릭해서 아래의 자격증명을 설정한다.
- 도커 허브 자격증명 설정 : dockerhub-crd
- Kind : Username with password
- Username : *<도커 계정명>*
- Password : *<도커 계정 암호 혹은 토큰>*
- ID : dockerhub-crd
- 깃헙 자격증명 설정: github-crd
- Kind: Username with password
- Username : git
- Password: *<깃헙 토큰>*
- ID: github-crd
Pipeline 만들어보기(도전과제3 Jenkins에 이미지 빌드를 Podman으로 하기)
모든 설정을 끝냈으니 샘플 pipeline을 만들어보자
http://localhost:30000/jenkins/view/all/newJob 로 접속해서 아래의 pipeline script를 입력해서 pipeline을 생성해본다.
item 이름은 sample-pipeline, type은 pipeline을 선택한다.
이전 시간에 kubernetes에서 docker build를 하는 방법들이 여러가지가 있었는데 DinD, buildah, podman, tekton 여기서는 podman을 사용해본다.
진행되는 과정은 아래와 같다
- jenkins 빌드 pipeline을 pod로 기동한다
- docker image 빌드를 위해서 podman을 사용한다
- github private repository를 연동해서 진행한다.
아래의 Pipeline Script를 Script에 입력하고 자신의 github, docker hub 계정명으로 입력해준다. 명시하지 않는 부분은 jnlp 컨테이너에서 실행된다.
pipeline {
    agent {
        kubernetes {
            yaml """
apiVersion: v1
kind: Pod
metadata:
  labels:
    jenkins-build: app-build
    some-label: "build-app-${BUILD_NUMBER}"
spec:
  containers:
  - name: podman
    image: quay.io/podman/stable:latest
    command: ['cat']
    tty: true
    securityContext:
      runAsUser: 1000
"""
        }
    }

    environment {
        DOCKER_IMAGE = '<자신의 docker hub 계정명>/dev-app'
    }

    stages {
        stage('Checkout') {
            steps {
                git branch: 'main',
                    url: 'https://github.com/***<자신의 Github 계정>***/dev-app.git',
                    credentialsId: 'github-crd'
            }
        }

        stage('Read VERSION') {
            steps {
                script {
                    def version = readFile('VERSION').trim()
                    env.DOCKER_TAG = version
                }
            }
        }

        stage('Build and Push with Podman') {
            steps {
                container('podman') {
                    script {
                        withCredentials([usernamePassword(
                            credentialsId: 'dockerhub-crd',
                            usernameVariable: 'DOCKER_USER',
                            passwordVariable: 'DOCKER_PASS'
                        )]) {
                            sh """
                                podman login -u \$DOCKER_USER -p \$DOCKER_PASS docker.io
                                podman build -t ${env.DOCKER_IMAGE}:${env.DOCKER_TAG} .
                                podman tag ${env.DOCKER_IMAGE}:${env.DOCKER_TAG} ${env.DOCKER_IMAGE}:latest
                                podman push ${env.DOCKER_IMAGE}:${env.DOCKER_TAG}
                                podman push ${env.DOCKER_IMAGE}:latest
                            """
                        }
                    }
                }
            }
        }
    }

    post {
        success {
            echo "✅ Successfully pushed ${env.DOCKER_IMAGE}:${env.DOCKER_TAG}"
        }
        failure {
            echo "❌ Pipeline failed."
        }
    }
}
Build Now 버튼을 클릭해서 보면 별도의 pod가 생성되어 진행됨을 볼 수 있고 docker hub에서 정상적으로 이미지가 업로드 된것을 확인할 수 있다.
sample-pipeline-6-bpv0k-ggnj9-f6m3x 내에 두개의 container가 있음을 볼 수 있다.
│ M1              podman            ●            quay.io/podman/stable:latest                           true            Running
│ M2              jnlp              ●            jenkins/inbound-agent:3341.v0766d82b_dec0-1            true            Running

k get pods -n jenkins -w
NAME        READY   STATUS    RESTARTS      AGE
jenkins-0   2/2     Running   1 (60m ago)   98m
sample-pipeline-6-bpv0k-ggnj9-f6m3x   0/2     Pending   0             0s
sample-pipeline-6-bpv0k-ggnj9-f6m3x   0/2     Pending   0             0s
sample-pipeline-6-bpv0k-ggnj9-f6m3x   0/2     ContainerCreating   0             0s
sample-pipeline-6-bpv0k-ggnj9-f6m3x   2/2     Running             0             3s
sample-pipeline-6-bpv0k-ggnj9-f6m3x   2/2     Terminating         0             34s
인제 위에서 빌드한 이미지가 실제 잘 동작하는지 Kubernetes에 배포를 해본다.
docker hub repo 가 private 이기 때문에 secret 설정이 필요하다.
# docker 자격증명 설정하기
DHUSER=<도커 허브 계정>
DHPASS=<도커 허브 암호 혹은 토큰>
echo $DHUSER $DHPASS

kubectl create secret docker-registry dockerhub-secret \
  --docker-server=https://index.docker.io/v1/ \
  --docker-username=$DHUSER \
  --docker-password=$DHPASS

# 확인 : base64 인코딩 확인
kubectl get secret dockerhub-secret -o jsonpath='{.data.\.dockerconfigjson}' | base64 -d | jq

# 디플로이먼트 오브젝트 업데이트 : 시크릿 적용 >> 아래 도커 계정 부분만 변경해서 배포해보자
cat <<EOF | kubectl apply -f -
apiVersion: apps/v1
kind: Deployment
metadata:
  name: timeserver
spec:
  replicas: 2
  selector:
    matchLabels:
      pod: timeserver-pod
  template:
    metadata:
      labels:
        pod: timeserver-pod
    spec:
      containers:
      - name: timeserver-container
        image: docker.io/$DHUSER/dev-app:0.0.1
        livenessProbe:
          initialDelaySeconds: 30
          periodSeconds: 30
          httpGet:
            path: /healthz
            port: 80
            scheme: HTTP
          timeoutSeconds: 5
          failureThreshold: 3
          successThreshold: 1
      imagePullSecrets:
      - name: dockerhub-secret
EOF
kubectl get deploy,rs,pod -o wide
NAME                         READY   UP-TO-DATE   AVAILABLE   AGE   CONTAINERS             IMAGES                                SELECTOR
deployment.apps/timeserver   0/2     2            0           11s   timeserver-container   docker.io//dev-app:0.0.1   pod=timeserver-pod

NAME                                   DESIRED   CURRENT   READY   AGE   CONTAINERS             IMAGES                                SELECTOR
replicaset.apps/timeserver-c6756dd48   2         2         0       11s   timeserver-container   docker.io//dev-app:0.0.1   pod=timeserver-pod,pod-template-hash=c6756dd48

NAME                             READY   STATUS              RESTARTS   AGE   IP       NODE           NOMINATED NODE   READINESS GATES
pod/timeserver-c6756dd48-92758   0/1     ContainerCreating   0          11s   <none>   myk8s-worker   <none>           <none>
pod/timeserver-c6756dd48-9rv9t   0/1     ContainerCreating   0          11s   <none>   myk8s-worker   <none>           <none>

# 서비스 생성
cat <<EOF | kubectl apply -f -
apiVersion: v1
kind: Service
metadata:
  name: timeserver
spec:
  selector:
    pod: timeserver-pod
  ports:
  - port: 80
    targetPort: 80
    protocol: TCP
    nodePort: 30001
  type: NodePort
EOF

# 확인
kubectl get service,ep timeserver -owide
NAME                 TYPE       CLUSTER-IP     EXTERNAL-IP   PORT(S)        AGE   SELECTOR
service/timeserver   NodePort   10.96.39.165   <none>        80:30001/TCP   31s   pod=timeserver-pod

NAME                   ENDPOINTS   AGE
endpoints/timeserver   <none>      31s

# Service(NodePort)로 접속 확인 "노드IP:NodePort"
curl http://127.0.0.1:30001
The time is 12:55:28 PM, VERSION 0.0.1
Server hostname: timeserver-c6756dd48-92758
curl http://127.0.0.1:30001
curl http://127.0.0.1:30001/healthz
업로드 이미지가 정상적으로 작동됨을 확인할 수 있다.
Github 연동으로 CI 자동화
지금까지는 수동으로 pipelien을 실행시켜서 이미지를 업로드하고 배포를 했지만 git을 연동하여 자동으로 main 브런치에 merge가 될 때 trigger되어 빌드하도록 해본다.
ngrok 설치 하기(사전에 ngrok 회원가입하여 토큰 발급 필요) https://ngrok.com/
brew install ngrok
ngrok config add-authtoken $YOUR_AUTHTOKEN
ngrok http 30000 # jenkins nodeport
🧠 Call internal services from your gateway: https://ngrok.com/r/http-request
Version 3.32.0
Region Japan (jp)
Latency 41ms
Web Interface http://127.0.0.1:4040
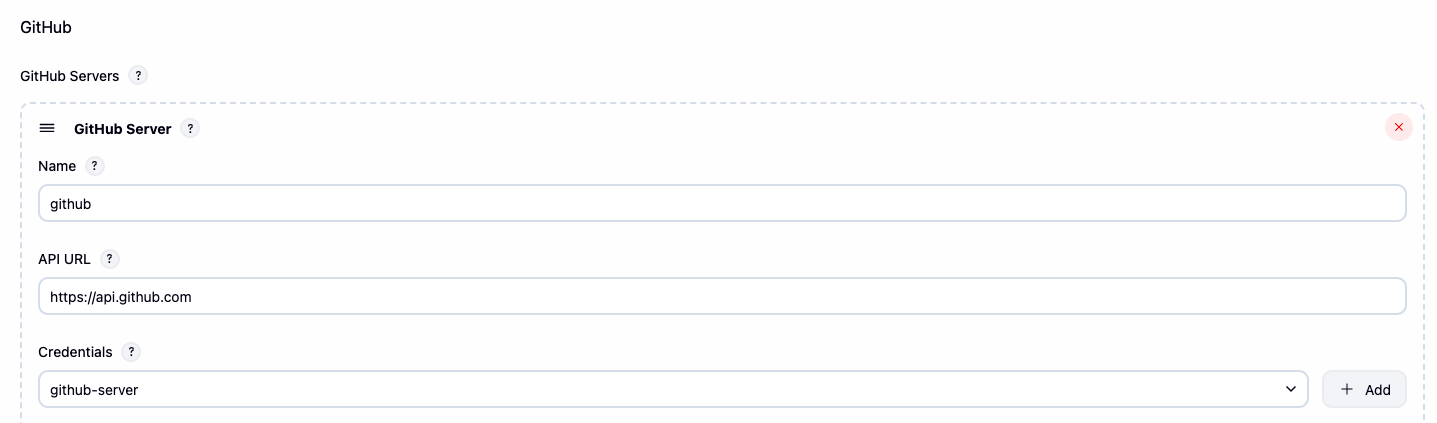
Forwarding https://dbe0ac43421f.ngrok-free.app -> http://localhost:30000Github Server 등록하기
발급했던 token을 가지고 아래와 같이 github-server credential을 생성해준다.

System Setting에서 아래와 같이 Github Server 설정을 하고 Test Connection을 한 후 정상적으로 연결되었으면 Apply를 한다.
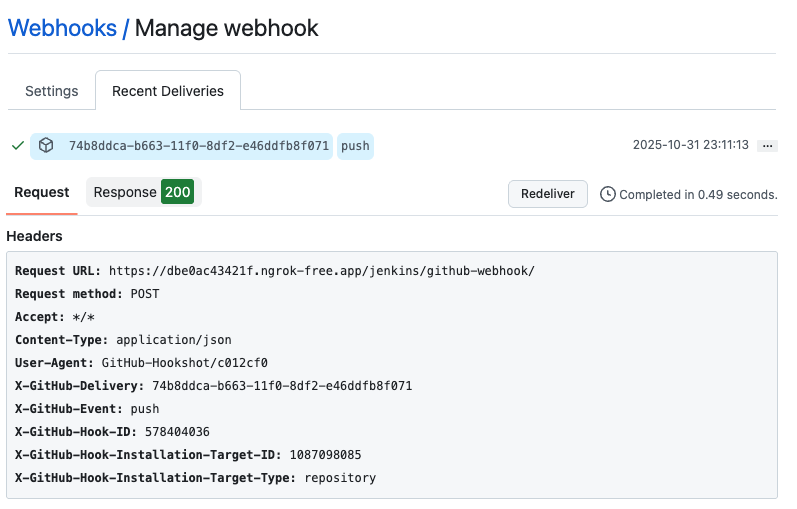
Github dev-app Repository로 이동하여 Settings 에서 Webhooks에서 Add Webhooks을 통해 아래와 같이 설정해준다.
Payload URL 은 ngrok에서 생성된 url에 jenkins/github-webhook/ 을 붙여서 설정한다 / 를 붙여야 한다.

그리고 나서 dev-app에서 Jenkinsfile을 아래와 같이 만들고 commit and push를 한다.
pipeline {
    agent {
        kubernetes {
            yaml """
apiVersion: v1
kind: Pod
metadata:
  labels:
    jenkins-build: app-build
    some-label: "build-app-${BUILD_NUMBER}"
spec:
  containers:
  - name: podman
    image: quay.io/podman/stable:latest
    command: ['cat']
    tty: true
    securityContext:
      runAsUser: 1000
"""
        }
    }

    environment {
        DOCKER_IMAGE = '<자신의 docker hub 계정명>/dev-app'
    }

    stages {
        stage('Checkout') {
            steps {
                git branch: 'main',
                    url: 'https://github.com/<자신의 github 계정명>/dev-app.git',
                    credentialsId: 'github-crd'
            }
        }

        stage('Read VERSION') {
            steps {
                script {
                    def version = readFile('VERSION').trim()
                    env.DOCKER_TAG = version
                }
            }
        }

        stage('Build and Push with Podman') {
            steps {
                container('podman') {
                    script {
                        withCredentials([usernamePassword(
                            credentialsId: 'dockerhub-crd',
                            usernameVariable: 'DOCKER_USER',
                            passwordVariable: 'DOCKER_PASS'
                        )]) {
                            sh """
                                podman login -u \$DOCKER_USER -p \$DOCKER_PASS docker.io
                                podman build -t ${env.DOCKER_IMAGE}:${env.DOCKER_TAG} .
                                podman tag ${env.DOCKER_IMAGE}:${env.DOCKER_TAG} ${env.DOCKER_IMAGE}:latest
                                podman push ${env.DOCKER_IMAGE}:${env.DOCKER_TAG}
                                podman push ${env.DOCKER_IMAGE}:latest
                            """
                        }
                    }
                }
            }
        }
    }

    post {
        success {
            echo "✅ Successfully pushed ${env.DOCKER_IMAGE}:${env.DOCKER_TAG}"
        }
        failure {
            echo "❌ Pipeline failed."
        }
    }
}

git add . && git commit -m "VERSION $(cat VERSION) Changed" && git push -u origin main
설정이 끝났으면 Jenkins에서 새로운 Item을 만든다. 아이템 이름은 SCM-Pipeline이며 Type은 Pipeline으로 하고 아래와 같이 설정해준다.
| General 설정 | Piepline SCM 설정 |
|---|---|
 |
 |
설정 후 Build Now를 클릭하면 Github에서 Jenkinsfile을 가져와서 연동됨을 확인 할 수 있다.
그리고 나서 VERSION의 값을 0.0.2 로 설정하고 다시 push 를 하면 jenkins pipeline 이 자동으로 trigger 됨을 확인 할 수 있다.
git add . && git commit -m "VERSION $(cat VERSION) Changed" && git push -u origin mainwebhook 기록확인
Jenkins로 CD하기
젠킨스로 kubernets에 deploy를 자동화하는 방법에 대해서 다뤄본다.
이전 실습에 디플로이먼트, 서비스 삭제
kubectl delete deploy,svc timeserver디플로이먼트 / 서비스 yaml 파일 작성 - http-echo 및 코드 push
cd dev-app
mkdir deploy

# service, deployment 작성
cat > deploy/echo-server-blue.yaml <<EOF
apiVersion: apps/v1
kind: Deployment
metadata:
  name: echo-server-blue
spec:
  replicas: 2
  selector:
    matchLabels:
      app: echo-server
      version: blue
  template:
    metadata:
      labels:
        app: echo-server
        version: blue
    spec:
      containers:
      - name: echo-server
        image: hashicorp/http-echo
        args:
        - "-text=Hello from Blue"
        ports:
        - containerPort: 5678
EOF

cat > deploy/echo-server-service.yaml <<EOF
apiVersion: v1
kind: Service
metadata:
  name: echo-server-service
spec:
  selector:
    app: echo-server
    version: blue
  ports:
  - protocol: TCP
    port: 80
    targetPort: 5678
    nodePort: 30001
  type: NodePort
EOF

cat > deploy/echo-server-green.yaml <<EOF
apiVersion: apps/v1
kind: Deployment
metadata:
  name: echo-server-green
spec:
  replicas: 2
  selector:
    matchLabels:
      app: echo-server
      version: green
  template:
    metadata:
      labels:
        app: echo-server
        version: green
    spec:
      containers:
      - name: echo-server
        image: hashicorp/http-echo
        args:
        - "-text=Hello from Green"
        ports:
        - containerPort: 5678
EOF

#
tree
.
├── deploy
│   ├── echo-server-blue.yaml
│   ├── echo-server-green.yaml
│   └── echo-server-service.yaml
├── Dockerfile
├── Jenkinsfile
├── README.md
├── server.py
└── VERSION
git add . && git commit -m "Add echo server yaml" && git push -u origin main
클러스터에 배포하기 위한 jenkins-service-account.yaml 수정
다른 네임스페이스에 배포하기 위한 권한이 필요함으로 아래와 같이 수정해서 배포한다.
# jenkins-service-account.yaml 만들기
cat <<EOT > jenkins-service-account.yaml
apiVersion: v1
kind: ServiceAccount
metadata:
  name: jenkins
  namespace: jenkins
---
apiVersion: rbac.authorization.k8s.io/v1
kind: ClusterRole
metadata:
  name: jenkins
rules:
- apiGroups: [""]
  resources: ["pods", "services", "configmaps", "secrets", "persistentvolumeclaims", "namespaces"]
  verbs: ["get", "list", "watch", "create", "update", "patch", "delete"]
- apiGroups: ["apps"]
  resources: ["deployments", "replicasets", "statefulsets", "daemonsets"]
  verbs: ["get", "list", "watch", "create", "update", "patch", "delete"]
- apiGroups: [""]
  resources: ["pods/exec", "pods/log", "pods/status"]
  verbs: ["create", "get", "list", "watch"]
- apiGroups: [""]
  resources: ["events"]
  verbs: ["watch"]
---
apiVersion: rbac.authorization.k8s.io/v1
kind: ClusterRoleBinding
metadata:
  name: jenkins
roleRef:
  apiGroup: rbac.authorization.k8s.io
  kind: ClusterRole
  name: jenkins
subjects:
- kind: ServiceAccount
  name: jenkins
  namespace: jenkins
EOT
Jenkins Item 생성(Pipeline) : item name(k8s-bluegreen) - Jenkins 통한 k8s 기본 배포
아래와 같이 pipeline script를 작성해서 사용한다.
pipeline {
    agent {
        kubernetes {
            defaultContainer 'jnlp'
            namespace 'jenkins'
            yaml """
apiVersion: v1
kind: Pod
metadata:
  namespace: jenkins
spec:
  serviceAccountName: jenkins
  containers:
  - name: jnlp
    image: jenkins/inbound-agent:latest
    args: ['\$(JENKINS_SECRET)', '\$(JENKINS_NAME)']
  - name: kubectl
    image: alpine/k8s:1.27.4
    command:
    - cat
    tty: true
    env:
    - name: WORKSPACE
      value: /home/jenkins/agent/workspace/${env.JOB_NAME}
"""
        }
    }

    environment {
        NAMESPACE = 'default'
    }

    stages {
        stage('Checkout') {
            steps {
                git branch: 'main',
                    url: 'https://github.com/***<자신의 github 계정>***/dev-app.git',
                    credentialsId: 'github-crd'
            }
        }

        stage('container image build') {
            steps {
                echo "container image build"
            }
        }

        stage('container image upload') {
            steps {
                echo "container image upload"
            }
        }

        stage('k8s deployment blue version') {
            steps {
                container('kubectl') {
                    sh """
                        cd \${WORKSPACE}
                        kubectl apply -f ./deploy/echo-server-blue.yaml -n \${NAMESPACE}
                        kubectl apply -f ./deploy/echo-server-service.yaml -n \${NAMESPACE}
                    """
                }
            }
        }

        stage('approve green version') {
            steps {
                input message: 'approve green version', ok: "Yes"
            }
        }

        stage('k8s deployment green version') {
            steps {
                container('kubectl') {
                    sh """
                        cd \${WORKSPACE}
                        kubectl apply -f ./deploy/echo-server-green.yaml -n \${NAMESPACE}
                    """
                }
            }
        }

        stage('approve version switching') {
            steps {
                script {
                    returnValue = input message: 'Green switching?', ok: "Yes",
                        parameters: [booleanParam(defaultValue: true, name: 'IS_SWITCHED')]
                    if (returnValue) {
                        container('kubectl') {
                            sh """
                                cd \${WORKSPACE}
                                kubectl patch svc echo-server-service -n \${NAMESPACE} \
                                -p '{\"spec\": {\"selector\": {\"version\": \"green\"}}}'
                            """
                        }
                    }
                }
            }
        }

        stage('Blue Rollback') {
            steps {
                script {
                    returnValue = input message: 'Blue Rollback?',
                        parameters: [choice(choices: ['done', 'rollback'], name: 'IS_ROLLBACK')]

                    if (returnValue == "done") {
                        container('kubectl') {
                            sh """
                                cd \${WORKSPACE}
                                kubectl delete -f ./deploy/echo-server-blue.yaml -n \${NAMESPACE}
                            """
                        }
                    }
                    if (returnValue == "rollback") {
                        container('kubectl') {
                            sh """
                                cd \${WORKSPACE}
                                kubectl patch svc echo-server-service -n \${NAMESPACE} \
                                -p '{\"spec\": {\"selector\": {\"version\": \"blue\"}}}'
                            """
                        }
                    }
                }
            }
        }
    }
}
실제 파이프라인을 통해 배포된 리소스를 확인할 수 있다
k get deploy,rs,pod -o wide

NAME                                READY   UP-TO-DATE   AVAILABLE   AGE    CONTAINERS    IMAGES                SELECTOR
deployment.apps/echo-server-blue    2/2     2            2           119s   echo-server   hashicorp/http-echo   app=echo-server,version=blue
deployment.apps/echo-server-green   2/2     2            2           98s    echo-server   hashicorp/http-echo   app=echo-server,version=green

NAME                                           DESIRED   CURRENT   READY   AGE    CONTAINERS    IMAGES                SELECTOR
replicaset.apps/echo-server-blue-749f8577f6    2         2         2       119s   echo-server   hashicorp/http-echo   app=echo-server,pod-template-hash=749f8577f6,version=blue
replicaset.apps/echo-server-green-6cc846dcb6   2         2         2       98s    echo-server   hashicorp/http-echo   app=echo-server,pod-template-hash=6cc846dcb6,version=green

NAME                                     READY   STATUS    RESTARTS   AGE    IP            NODE           NOMINATED NODE   READINESS GATES
pod/echo-server-blue-749f8577f6-6cwj9    1/1     Running   0          119s   10.244.1.49   myk8s-worker   <none>           <none>
pod/echo-server-blue-749f8577f6-rctlg    1/1     Running   0          119s   10.244.1.48   myk8s-worker   <none>           <none>
pod/echo-server-green-6cc846dcb6-mbb4w   1/1     Running   0          98s    10.244.1.51   myk8s-worker   <none>           <none>
pod/echo-server-green-6cc846dcb6-n2j65   1/1     Running   0          98s    10.244.1.50   myk8s-worker   <none>           <none>
ArgoCD
Jenkins는 주로 CI용도로만 사용되고 CD는 주로 ArgoCD를 많이 이용한다. Jenkins는 CI 할때는 최적화되어있지만 CD 시 여러가지 옵션들은 ArgoCD가 더 풍부하게 제공 하기 때문인것 같다.
설치
# 네임스페이스 생성 및 파라미터 파일 작성
cd cicd-labs

kubectl create ns argocd
cat <<EOF > argocd-values.yaml
dex:
  enabled: false

server:
  service:
    type: NodePort
    nodePortHttps: 30002
  extraArgs:
    - --insecure  # HTTPS 대신 HTTP 사용
EOF

# 설치 : Argo CD v3.1.9 , (참고) 책 버전 v2.10.5
helm repo add argo https://argoproj.github.io/argo-helm
helm install argocd argo/argo-cd --version 9.0.5 -f argocd-values.yaml --namespace argocd

# 확인
kubectl get pod,svc,ep,secret,cm -n argocd
kubectl get crd | grep argo

# configmap
kubectl get cm -n argocd argocd-cm -o yaml
kubectl get cm -n argocd argocd-rbac-cm -o yaml
...
data:
  policy.csv: ""
  policy.default: ""
  policy.matchMode: glob
  scopes: '[groups]'

# 최초 접속 암호 확인
kubectl -n argocd get secret argocd-initial-admin-secret -o jsonpath="{.data.password}" | base64 -d ;echo
ZQlsiv6cZAca2pY1

# Argo CD 웹 접속 주소 확인 : 초기 암호 입력 (admin 계정)
open "http://127.0.0.1:30002" # macOS
ops-deploy Repo 등록 : Settings → Repositories → CONNECT REPO 클릭
- connection method : VIA HTTPS
- Type : git
- Project : default
- Repo URL :
https://github.com/***<자신의 github ID>***/ops-deploy - Username : git
- Password : *<Github 토큰>*
- ⇒ 입력 후 CONNECT 클릭
CONNECTION STATUS 가 Successful로 되면 정상적으로 진행 완료
구성은 다되었고 Github에서 Push 하면 ArgoCD에서 반영하여 배포하도록 구성하는 실습을 해본다.
Github Push → ArgoCD
이를 위해 Github Webhook을 등록한다. 등록하는 방법은 위 Jenkins Webhook 방법을 참고하자
ngrook http 30002
🧠 Call internal services from your gateway: https://ngrok.com/r/http-request

Version                       3.32.0
Region                        Japan (jp)
Latency                       40ms
Web Interface                 http://127.0.0.1:4040
Forwarding                    https://c51b524cf5fa.ngrok-free.app -> http://localhost:30002

https://c51b524cf5fa.ngrok-free.app/api/webhook 주소를 Github에 등록
정상 연결이 되었음을 확인 할 수 있다.
실제 배포할 애플리케이션에 대한 배포 정보를 ops-deploy 에 작성
해당 git을 ArgoCD Application 으로 만들 것이다.
cd cicd-labs

TOKEN=<자신의 github token>
git clone https://git:$TOKEN@github.com/***<자신의 Github 계정>***/ops-deploy.git
cd ops-deploy

#
git config --local user.name "devops"
git config --local user.email "a@a.com"
git config --local init.defaultBranch main
git config --local credential.helper store
git --no-pager config --local --list
git --no-pager branch
git remote -v

#
VERSION=1.26.1
mkdir nginx-chart
mkdir nginx-chart/templates

cat > nginx-chart/VERSION <<EOF
$VERSION
EOF

cat > nginx-chart/templates/configmap.yaml <<EOF
apiVersion: v1
kind: ConfigMap
metadata:
  name: {{ .Release.Name }}
data:
  index.html: |
{{ .Values.indexHtml | indent 4 }}
EOF

cat > nginx-chart/templates/deployment.yaml <<EOF
apiVersion: apps/v1
kind: Deployment
metadata:
  name: {{ .Release.Name }}
spec:
  replicas: {{ .Values.replicaCount }}
  selector:
    matchLabels:
      app: {{ .Release.Name }}
  template:
    metadata:
      labels:
        app: {{ .Release.Name }}
    spec:
      containers:
      - name: nginx
        image: {{ .Values.image.repository }}:{{ .Values.image.tag }}
        ports:
        - containerPort: 80
        volumeMounts:
        - name: index-html
          mountPath: /usr/share/nginx/html/index.html
          subPath: index.html
      volumes:
      - name: index-html
        configMap:
          name: {{ .Release.Name }}
EOF

cat > nginx-chart/templates/service.yaml <<EOF
apiVersion: v1
kind: Service
metadata:
  name: {{ .Release.Name }}
spec:
  selector:
    app: {{ .Release.Name }}
  ports:
  - protocol: TCP
    port: 80
    targetPort: 80
    nodePort: 30003
  type: NodePort
EOF

cat > nginx-chart/values-dev.yaml <<EOF
indexHtml: |
  <!DOCTYPE html>
  <html>
  <head>
    <title>Welcome to Nginx!</title>
  </head>
  <body>
    <h1>Hello, Kubernetes!</h1>
    <p>DEV : Nginx version $VERSION</p>
  </body>
  </html>

image:
  repository: nginx
  tag: $VERSION

replicaCount: 1
EOF

cat > nginx-chart/values-prd.yaml <<EOF
indexHtml: |
  <!DOCTYPE html>
  <html>
  <head>
    <title>Welcome to Nginx!</title>
  </head>
  <body>
    <h1>Hello, Kubernetes!</h1>
    <p>PRD : Nginx version $VERSION</p>
  </body>
  </html>

image:
  repository: nginx
  tag: $VERSION

replicaCount: 2
EOF

cat > nginx-chart/Chart.yaml <<EOF
apiVersion: v2
name: nginx-chart
description: A Helm chart for deploying Nginx with custom index.html
type: application
version: 1.0.0
appVersion: "$VERSION"
EOF

tree nginx-chart
nginx-chart
├── Chart.yaml
├── templates
│   ├── configmap.yaml
│   ├── deployment.yaml
│   └── service.yaml
├── values-dev.yaml
├── values-prd.yaml
└── VERSION

# git push
git status && git add . && git commit -m "Add nginx helm chart" && git push -u origin main
ArgoCD Application을 생성한다
cat <<EOF | kubectl apply -f -
apiVersion: argoproj.io/v1alpha1
kind: Application
metadata:
  name: dev-nginx
  namespace: argocd
  finalizers:
  - resources-finalizer.argocd.argoproj.io
spec:
  project: default
  source:
    helm:
      valueFiles:
      - values-dev.yaml
    path: nginx-chart
    repoURL: https://github.com/**<자신의 Github 계정>**/ops-deploy
    targetRevision: HEAD
  syncPolicy:
    automated:
      prune: true
    syncOptions:
    - CreateNamespace=true
  destination:
    namespace: dev-nginx
    server: https://kubernetes.default.svc
EOF

# 확인
kubectl get applications -n argocd dev-nginx
NAME        SYNC STATUS   HEALTH STATUS
dev-nginx   Synced        Progressing
kubectl get applications -n argocd dev-nginx -o yaml | kubectl neat
kubectl describe applications -n argocd dev-nginx
kubectl get pod,svc,ep,cm -n dev-nginx
NAME                            READY   STATUS    RESTARTS   AGE
pod/dev-nginx-59f4c8899-hx6dd   1/1     Running   0          22s

NAME                TYPE       CLUSTER-IP      EXTERNAL-IP   PORT(S)        AGE
service/dev-nginx   NodePort   10.96.220.244   <none>        80:30003/TCP   22s

NAME                  ENDPOINTS        AGE
endpoints/dev-nginx   10.244.1.59:80   22s

NAME                         DATA   AGE
configmap/dev-nginx          1      22s
configmap/kube-root-ca.crt   1      22s

# 실제 nginx 확인
curl http://127.0.0.1:30003
open http://127.0.0.1:30003
실제 Github하고 연동되었는 지 확인하기 위해서 Github에서 배포 yaml을 수정하고 Trigger되는지 확인해보자
cd cicd-labs/ops-deploy/nginx-chart

# replicaCount 증가
sed -i '' "s|replicaCount: 1|replicaCount: 3|g" values-dev.yaml
git add values-dev.yaml && git commit -m "Modify nginx-chart : values-dev.yaml" && git push -u origin main
watch -d kubectl get all -n dev-nginx -o wide

# replicaCount 증가
sed -i '' "s|replicaCount: 3|replicaCount: 4|g" values-dev.yaml
git add values-dev.yaml && git commit -m "Modify nginx-chart : values-dev.yaml" && git push -u origin main
watch -d kubectl get all -n dev-nginx -o wide

# replicaCount 감소
sed -i "s|replicaCount: 4|replicaCount: 2|g" values-dev.yaml
git add values-dev.yaml && git commit -m "Modify nginx-chart : values-dev.yaml" && git push -u origin main
watch -d kubectl get all -n dev-nginx -o wide

NAME                            READY   STATUS    RESTARTS   AGE     IP            NODE           NOMINATED NODE   READINESS GATES
pod/dev-nginx-59f4c8899-28zd4   1/1     Running   0          73s     10.244.1.64   myk8s-worker   <none>           <none>
pod/dev-nginx-59f4c8899-f96h2   1/1     Running   0          73s     10.244.1.63   myk8s-worker   <none>           <none>
pod/dev-nginx-59f4c8899-hx6dd   1/1     Running   0          10m     10.244.1.59   myk8s-worker   <none>           <none>
pod/dev-nginx-59f4c8899-q27r5   1/1     Running   0          3m16s   10.244.1.60   myk8s-worker   <none>           <none>

NAME                TYPE       CLUSTER-IP      EXTERNAL-IP   PORT(S)        AGE   SELECTOR
service/dev-nginx   NodePort   10.96.220.244   <none>        80:30003/TCP   10m   app=dev-nginx

NAME                        READY   UP-TO-DATE   AVAILABLE   AGE   CONTAINERS   IMAGES         SELECTOR
deployment.apps/dev-nginx   4/4     4            4           10m   nginx        nginx:1.26.1   app=dev-nginx

NAME                                  DESIRED   CURRENT   READY   AGE   CONTAINERS   IMAGES         SELECTOR
replicaset.apps/dev-nginx-59f4c8899   4         4         4       10m   nginx        nginx:1.26.1   app=dev-nginx,pod-template-hash=59f4c8899
배포가 매우 빠르게 반영되어 실제 스크린샷을 찍기는 힘들었지만 Github에 Push 한 내용이 바로 ArgoCD에 자동으로 Sync 되어 배포 됨을 확인 할 수 있었다.
아래는 실제 생성된 Application 이다.

Argo CD Application 삭제
kubectl delete applications -n argocd dev-nginxJenkins + ArgoCD
Jenkins로 CI를 하고 ArgoCD에서 CD를 진행하는 실제 현업에서 많이 활용되는 CI/CD 패턴을 실습해본다.
Repo(ops-deploy) 기본 코드 작성
cd ops-deploy
mkdir dev-app

# 도커 계정 정보
DHUSER=<도커 허브 계정>
DHPASS=<도커 허브 토큰>

# 버전 정보
VERSION=0.0.1

# 버전 파일 생성
cat > dev-app/VERSION <<EOF
$VERSION
EOF

cat > dev-app/timeserver.yaml <<EOF
apiVersion: apps/v1
kind: Deployment
metadata:
  name: timeserver
spec:
  replicas: 2
  selector:
    matchLabels:
      pod: timeserver-pod
  template:
    metadata:
      labels:
        pod: timeserver-pod
    spec:
      containers:
      - name: timeserver-container
        image: docker.io/$DHUSER/dev-app:$VERSION
        livenessProbe:
          initialDelaySeconds: 30
          periodSeconds: 30
          httpGet:
            path: /healthz
            port: 80
            scheme: HTTP
          timeoutSeconds: 5
          failureThreshold: 3
          successThreshold: 1
      imagePullSecrets:
      - name: dockerhub-secret
EOF

cat > dev-app/service.yaml <<EOF
apiVersion: v1
kind: Service
metadata:
  name: timeserver
spec:
  selector:
    pod: timeserver-pod
  ports:
  - port: 80
    targetPort: 80
    protocol: TCP
    nodePort: 30003
  type: NodePort
EOF

# git에 push & commit
git add . && git commit -m "Add dev-app deployment yaml" && git push -u origin mainRepo(ops-deploy) 를 바라보는 ArgoCD App 생성
cat <<EOF | kubectl apply -f -
apiVersion: argoproj.io/v1alpha1
kind: Application
metadata:
  name: timeserver
  namespace: argocd
  finalizers:
  - resources-finalizer.argocd.argoproj.io
spec:
  project: default
  source:
    path: dev-app
    repoURL: https://github.com/***<자신의 Github 계정>***/ops-deploy
    targetRevision: HEAD
  syncPolicy:
    automated:
      prune: true
    syncOptions:
    - CreateNamespace=true
  destination:
    namespace: default
    server: https://kubernetes.default.svc
EOF

# 확인
kubectl get applications -n argocd timeserver
NAME         SYNC STATUS   HEALTH STATUS
timeserver   Synced        Healthy
kubectl get applications -n argocd timeserver -o yaml | kubectl neat
kubectl describe applications -n argocd timeserver
kubectl get deploy,rs,pod
kubectl get svc,ep timeserver
NAME                 TYPE       CLUSTER-IP     EXTERNAL-IP   PORT(S)        AGE
service/timeserver   NodePort   10.96.25.212   <none>        80:30003/TCP   45s

NAME                   ENDPOINTS                       AGE
endpoints/timeserver   10.244.1.65:80,10.244.1.66:80   45s

# 브라우저 확인
curl http://127.0.0.1:30003
curl http://127.0.0.1:30003/healthz
Healthy
open http://127.0.0.1:30003Repo(dev-app) 코드 작업
dev-app Repo에 VERSION 업데이트 시 → ops-deploy Repo 에 dev-app 에 파일에 버전 정보 업데이트 작업 추가
- 기존 버전 정보는 VERSION 파일 내에 정보를 가져와서 변수 지정 :
OLDVER=$(cat dev-app/VERSION) - 신규 버전 정보는 environment 도커 태그 정보를 가져와서 변수 지정 :
NEWVER=$(echo ${DOCKER_TAG}) - 이후 sed 로 ops-deploy Repo 에 dev-app/VERSION, timeserver.yaml 2개 파일에 ‘기존 버전’ → ‘신규 버전’으로 값 변경
- 이후 ops-deploy Repo 에 git push ⇒ Argo CD App Trigger 후 AutoSync 로 신규 버전 업데이트 진행
dev-app에 있는 Jenkinsfile을 아래의 script로 바꾸고 push & commit을 해준다.
pipeline {
    agent {
        kubernetes {
            yaml """
apiVersion: v1
kind: Pod
metadata:
  labels:
    jenkins-build: app-build
    some-label: "build-app-${BUILD_NUMBER}"
spec:
  containers:
  - name: podman
    image: quay.io/podman/stable:latest
    command: ['cat']
    tty: true
    securityContext:
      runAsUser: 1000
"""
        }
    }

    environment {
        DOCKER_IMAGE = '***<자신의 Dockerhub 계정>***/dev-app'
        GITHUBCRD = credentials('github-crd')
    }

    stages {
        stage('dev-app Checkout') {
            steps {
                git branch: 'main',
                    url: 'https://github.com/***<자신의 Github 계정>***/dev-app.git',
                    credentialsId: 'github-crd'
            }
        }

        stage('Read VERSION') {
            steps {
                script {
                    def version = readFile('VERSION').trim()
                    echo "Version found: ${version}"
                    env.DOCKER_TAG = version
                }
            }
        }

        stage('Build and Push with Podman') {
            steps {
                container('podman') {
                    script {
                        withCredentials([usernamePassword(
                            credentialsId: 'dockerhub-crd',
                            usernameVariable: 'DOCKER_USER',
                            passwordVariable: 'DOCKER_PASS'
                        )]) {
                            sh """
                                podman login -u \$DOCKER_USER -p \$DOCKER_PASS docker.io
                                podman build -t ${env.DOCKER_IMAGE}:${env.DOCKER_TAG} .
                                podman tag ${env.DOCKER_IMAGE}:${env.DOCKER_TAG} ${env.DOCKER_IMAGE}:latest
                                podman push ${env.DOCKER_IMAGE}:${env.DOCKER_TAG}
                                podman push ${env.DOCKER_IMAGE}:latest
                            """
                        }
                    }
                }
            }
        }

        stage('ops-deploy Checkout') {
            steps {
                 git branch: 'main',
                 url: 'https://github.com/**<자신의 Github 계정>**/ops-deploy.git',  // Git에서 코드 체크아웃
                 credentialsId: 'github-crd'  // Credentials ID
            }
        }

        stage('ops-deploy version update push') {
            steps {
                **sh '''**
                OLDVER=$(cat dev-app/VERSION)
                NEWVER=$(echo ${DOCKER_TAG})
                sed -i '' "s/$OLDVER/$NEWVER/" dev-app/timeserver.yaml
                sed -i '' "s/$OLDVER/$NEWVER/" dev-app/VERSION
                git add ./dev-app
                git config user.name "devops"
                git config user.email "a@a.com"
                git commit -m "version update ${DOCKER_TAG}"
                git push https://${GITHUBCRD_USR}:${GITHUBCRD_PSW}@github.com/***<자신의 Github 계정>*/**ops-deploy.git
                **'''**
            }
        }
    }

    post {
        success {
            echo "✅ Docker image ${DOCKER_IMAGE}:${DOCKER_TAG} has been built and pushed successfully!"
        }
        failure {
            echo "❌ Pipeline failed. Please check the logs."
        }
    }
}

git add . && git commit -m "VERSION $(cat VERSION) Changed" && git push -u origin main
버전 바꾸고 push
# [터미널] 동작 확인 모니터링
while true; do curl -s --connect-timeout 1 http://127.0.0.1:30003 ; echo ; kubectl get deploy timeserver -owide; echo "------------" ; sleep 1 ; done

# VERSION 파일 수정 : 0.0.3
# server.py 파일 수정 : 0.0.3

git add . && git commit -m "VERSION $(cat VERSION) Changed" && git push -u origin main
Full CI/CD 동작 확인 : Argo CD app Trigger 후 AutoSync 로 신규 버전 업데이트 진행 확인
ngrok 이 계정당 하나의 proxy만 사용가능함으로 Jenkins는 수동으로 Build Now를 해주고 ArgoCD가 자동으로 바뀌는 지 확인해본다.
while true; do curl -s --connect-timeout 1 http://127.0.0.1:30003 ; echo ; kubectl get deploy timeserver -owide; echo "------------" ; sleep 1 ; done

NAME         READY   UP-TO-DATE   AVAILABLE   AGE   CONTAINERS             IMAGES                                SELECTOR
timeserver   2/2     2            2           24m   timeserver-container   docker.io//dev-app:0.0.3   pod=timeserver-pod
------------
The time is 6:59:39 PM, VERSION 0.0.3
Server hostname: timeserver-5845756b6-tgw9t
Jenkins Pipeline

ArgoCD 버전 Comment를 확인해보면 version update 0.0.3 으로 된것 을 확인 해 볼 수 있다.

위와 같이 Jenkins + ArgoCD 조합으로 CI/CD를 구현할 수 있다.
'스터디 > [gasida] ci-cd 스터디 1기' 카테고리의 다른 글
| OpenLDAP + KeyCloak + Argo CD + Jenkins (0) | 2025.11.23 |
|---|---|
| ArgoCD ApplicationSet (0) | 2025.11.23 |
| Arocd Rollout (0) | 2025.11.16 |
| ArgoCD + Ingress + Self Managed (0) | 2025.11.16 |
| 4주차: Argo (0) | 2025.11.09 |