6주차
쿠버네티스 데이터베이스 오퍼레이터 6주차
Stackable

설치
# 다운로드
curl -L -o stackablectl https://github.com/stackabletech/stackable-cockpit/releases/download/stackablectl-1.0.0-rc3/stackablectl-x86_64-unknown-linux-gnu
chmod +x stackablectl
mv stackablectl /usr/local/bin

# 확인
stackablectl -h # 도움말
stackablectl -V # 버전확인
---
stackablectl 1.0.0-rc3

stackablectl release list
---
┌───┬─────────┬──────────────┬─────────────────────────────────────────────────────────────────────────────┐
│ # ┆ RELEASE ┆ RELEASE DATE ┆ DESCRIPTION                                                                 │
╞═══╪═════════╪══════════════╪═════════════════════════════════════════════════════════════════════════════╡
│ 1 ┆ 23.7    ┆ 2023-07-26   ┆ Sixth release focusing on resources and pod overrides                       │
├╌╌╌┼╌╌╌╌╌╌╌╌╌┼╌╌╌╌╌╌╌╌╌╌╌╌╌╌┼╌╌╌╌╌╌╌╌╌╌╌╌╌╌╌╌╌╌╌╌╌╌╌╌╌╌╌╌╌╌╌╌╌╌╌╌╌╌╌╌╌╌╌╌╌╌╌╌╌╌╌╌╌╌╌╌╌╌╌╌╌╌╌╌╌╌╌╌╌╌╌╌╌╌╌╌╌┤
│ 2 ┆ 23.4    ┆ 2023-05-17   ┆ Fifth release focusing on affinities and product status                     │
├╌╌╌┼╌╌╌╌╌╌╌╌╌┼╌╌╌╌╌╌╌╌╌╌╌╌╌╌┼╌╌╌╌╌╌╌╌╌╌╌╌╌╌╌╌╌╌╌╌╌╌╌╌╌╌╌╌╌╌╌╌╌╌╌╌╌╌╌╌╌╌╌╌╌╌╌╌╌╌╌╌╌╌╌╌╌╌╌╌╌╌╌╌╌╌╌╌╌╌╌╌╌╌╌╌╌┤
│ 3 ┆ 23.1    ┆ 2023-01-27   ┆ Fourth release focusing on image selection and logging                      │
├╌╌╌┼╌╌╌╌╌╌╌╌╌┼╌╌╌╌╌╌╌╌╌╌╌╌╌╌┼╌╌╌╌╌╌╌╌╌╌╌╌╌╌╌╌╌╌╌╌╌╌╌╌╌╌╌╌╌╌╌╌╌╌╌╌╌╌╌╌╌╌╌╌╌╌╌╌╌╌╌╌╌╌╌╌╌╌╌╌╌╌╌╌╌╌╌╌╌╌╌╌╌╌╌╌╌┤
│ 4 ┆ 22.11   ┆ 2022-11-14   ┆ Third release focusing on resource management                               │
├╌╌╌┼╌╌╌╌╌╌╌╌╌┼╌╌╌╌╌╌╌╌╌╌╌╌╌╌┼╌╌╌╌╌╌╌╌╌╌╌╌╌╌╌╌╌╌╌╌╌╌╌╌╌╌╌╌╌╌╌╌╌╌╌╌╌╌╌╌╌╌╌╌╌╌╌╌╌╌╌╌╌╌╌╌╌╌╌╌╌╌╌╌╌╌╌╌╌╌╌╌╌╌╌╌╌┤
│ 5 ┆ 22.09   ┆ 2022-09-09   ┆ Second release focusing on security and OpenShift support                   │
├╌╌╌┼╌╌╌╌╌╌╌╌╌┼╌╌╌╌╌╌╌╌╌╌╌╌╌╌┼╌╌╌╌╌╌╌╌╌╌╌╌╌╌╌╌╌╌╌╌╌╌╌╌╌╌╌╌╌╌╌╌╌╌╌╌╌╌╌╌╌╌╌╌╌╌╌╌╌╌╌╌╌╌╌╌╌╌╌╌╌╌╌╌╌╌╌╌╌╌╌╌╌╌╌╌╌┤
│ 6 ┆ 22.06   ┆ 2022-06-30   ┆ First official release of the Stackable Data Platform                       │
├╌╌╌┼╌╌╌╌╌╌╌╌╌┼╌╌╌╌╌╌╌╌╌╌╌╌╌╌┼╌╌╌╌╌╌╌╌╌╌╌╌╌╌╌╌╌╌╌╌╌╌╌╌╌╌╌╌╌╌╌╌╌╌╌╌╌╌╌╌╌╌╌╌╌╌╌╌╌╌╌╌╌╌╌╌╌╌╌╌╌╌╌╌╌╌╌╌╌╌╌╌╌╌╌╌╌┤
│ 7 ┆ latest  ┆ 2023-07-26   ┆ Always pointing to the latest stable version of the Stackable Data Platform │
├╌╌╌┼╌╌╌╌╌╌╌╌╌┼╌╌╌╌╌╌╌╌╌╌╌╌╌╌┼╌╌╌╌╌╌╌╌╌╌╌╌╌╌╌╌╌╌╌╌╌╌╌╌╌╌╌╌╌╌╌╌╌╌╌╌╌╌╌╌╌╌╌╌╌╌╌╌╌╌╌╌╌╌╌╌╌╌╌╌╌╌╌╌╌╌╌╌╌╌╌╌╌╌╌╌╌┤
│ 8 ┆ dev     ┆ 2023-01-27   ┆ Development versions from main branch. Not stable!                          │
└───┴─────────┴──────────────┴─────────────────────────────────────────────────────────────────────────────┘

# 자동완성
wget https://raw.githubusercontent.com/stackabletech/stackable-cockpit/main/extra/completions/stackablectl.bash
mv stackablectl.bash /etc/bash_completion.d/
stakablectl 제공하는 stack과 demo, operator 정보를 확인 할려면 아래의 명령어로 확인 할 수 있다.
# 제공 오퍼레이터
stackablectl operator list
---
┌────┬───────────┬─────────────────────────────────────────────────────────────────────────────────────────────────┐
│ #  ┆ OPERATOR  ┆ STABLE VERSIONS                                                                                 │
╞════╪═══════════╪═════════════════════════════════════════════════════════════════════════════════════════════════╡
│ 1  ┆ airflow   ┆ 0.1.0, 0.2.0, 0.3.0, 0.4.0, 0.5.0, 0.6.0, 23.1.0, 23.11.0, 23.4.0, 23.4.1, 23.7.0               │
├╌╌╌╌┼╌╌╌╌╌╌╌╌╌╌╌┼╌╌╌╌╌╌╌╌╌╌╌╌╌╌╌╌╌╌╌╌╌╌╌╌╌╌╌╌╌╌╌╌╌╌╌╌╌╌╌╌╌╌╌╌╌╌╌╌╌╌╌╌╌╌╌╌╌╌╌╌╌╌╌╌╌╌╌╌╌╌╌╌╌╌╌╌╌╌╌╌╌╌╌╌╌╌╌╌╌╌╌╌╌╌╌╌╌┤
│ 2  ┆ commons   ┆ 0.1.0, 0.2.0, 0.2.1, 0.3.0, 0.4.0, 23.1.0, 23.11.0, 23.4.0, 23.4.1, 23.7.0                      │
├╌╌╌╌┼╌╌╌╌╌╌╌╌╌╌╌┼╌╌╌╌╌╌╌╌╌╌╌╌╌╌╌╌╌╌╌╌╌╌╌╌╌╌╌╌╌╌╌╌╌╌╌╌╌╌╌╌╌╌╌╌╌╌╌╌╌╌╌╌╌╌╌╌╌╌╌╌╌╌╌╌╌╌╌╌╌╌╌╌╌╌╌╌╌╌╌╌╌╌╌╌╌╌╌╌╌╌╌╌╌╌╌╌╌┤
│ 3  ┆ druid     ┆ 0.1.0, 0.2.0, 0.3.0, 0.4.0, 0.5.0, 0.6.0, 0.7.0, 0.8.0, 23.1.0, 23.11.0, 23.4.0, 23.4.1, 23.7.0 │
├╌╌╌╌┼╌╌╌╌╌╌╌╌╌╌╌┼╌╌╌╌╌╌╌╌╌╌╌╌╌╌╌╌╌╌╌╌╌╌╌╌╌╌╌╌╌╌╌╌╌╌╌╌╌╌╌╌╌╌╌╌╌╌╌╌╌╌╌╌╌╌╌╌╌╌╌╌╌╌╌╌╌╌╌╌╌╌╌╌╌╌╌╌╌╌╌╌╌╌╌╌╌╌╌╌╌╌╌╌╌╌╌╌╌┤
│ 4  ┆ hbase     ┆ 0.2.0, 0.3.0, 0.4.0, 0.5.0, 23.1.0, 23.11.0, 23.4.0, 23.4.1, 23.7.0                             │
├╌╌╌╌┼╌╌╌╌╌╌╌╌╌╌╌┼╌╌╌╌╌╌╌╌╌╌╌╌╌╌╌╌╌╌╌╌╌╌╌╌╌╌╌╌╌╌╌╌╌╌╌╌╌╌╌╌╌╌╌╌╌╌╌╌╌╌╌╌╌╌╌╌╌╌╌╌╌╌╌╌╌╌╌╌╌╌╌╌╌╌╌╌╌╌╌╌╌╌╌╌╌╌╌╌╌╌╌╌╌╌╌╌╌┤
│ 5  ┆ hdfs      ┆ 0.3.0, 0.4.0, 0.5.0, 0.6.0, 23.1.0, 23.11.0, 23.4.0, 23.4.1, 23.7.0                             │
├╌╌╌╌┼╌╌╌╌╌╌╌╌╌╌╌┼╌╌╌╌╌╌╌╌╌╌╌╌╌╌╌╌╌╌╌╌╌╌╌╌╌╌╌╌╌╌╌╌╌╌╌╌╌╌╌╌╌╌╌╌╌╌╌╌╌╌╌╌╌╌╌╌╌╌╌╌╌╌╌╌╌╌╌╌╌╌╌╌╌╌╌╌╌╌╌╌╌╌╌╌╌╌╌╌╌╌╌╌╌╌╌╌╌┤
│ 6  ┆ hive      ┆ 0.3.0, 0.5.0, 0.6.0, 0.7.0, 0.8.0, 23.1.0, 23.11.0, 23.4.0, 23.4.1, 23.7.0                      │
├╌╌╌╌┼╌╌╌╌╌╌╌╌╌╌╌┼╌╌╌╌╌╌╌╌╌╌╌╌╌╌╌╌╌╌╌╌╌╌╌╌╌╌╌╌╌╌╌╌╌╌╌╌╌╌╌╌╌╌╌╌╌╌╌╌╌╌╌╌╌╌╌╌╌╌╌╌╌╌╌╌╌╌╌╌╌╌╌╌╌╌╌╌╌╌╌╌╌╌╌╌╌╌╌╌╌╌╌╌╌╌╌╌╌┤
│ 7  ┆ kafka     ┆ 0.4.0, 0.5.0, 0.6.0, 0.7.0, 0.8.0, 23.1.0, 23.11.0, 23.4.0, 23.4.1, 23.7.0                      │
├╌╌╌╌┼╌╌╌╌╌╌╌╌╌╌╌┼╌╌╌╌╌╌╌╌╌╌╌╌╌╌╌╌╌╌╌╌╌╌╌╌╌╌╌╌╌╌╌╌╌╌╌╌╌╌╌╌╌╌╌╌╌╌╌╌╌╌╌╌╌╌╌╌╌╌╌╌╌╌╌╌╌╌╌╌╌╌╌╌╌╌╌╌╌╌╌╌╌╌╌╌╌╌╌╌╌╌╌╌╌╌╌╌╌┤
│ 8  ┆ listener  ┆ 23.1.0, 23.11.0, 23.4.0, 23.4.1, 23.7.0                                                         │
├╌╌╌╌┼╌╌╌╌╌╌╌╌╌╌╌┼╌╌╌╌╌╌╌╌╌╌╌╌╌╌╌╌╌╌╌╌╌╌╌╌╌╌╌╌╌╌╌╌╌╌╌╌╌╌╌╌╌╌╌╌╌╌╌╌╌╌╌╌╌╌╌╌╌╌╌╌╌╌╌╌╌╌╌╌╌╌╌╌╌╌╌╌╌╌╌╌╌╌╌╌╌╌╌╌╌╌╌╌╌╌╌╌╌┤
│ 9  ┆ nifi      ┆ 0.4.0, 0.5.0, 0.6.0, 0.7.0, 0.8.0, 0.8.1, 23.1.0, 23.11.0, 23.4.0, 23.4.1, 23.7.0               │
├╌╌╌╌┼╌╌╌╌╌╌╌╌╌╌╌┼╌╌╌╌╌╌╌╌╌╌╌╌╌╌╌╌╌╌╌╌╌╌╌╌╌╌╌╌╌╌╌╌╌╌╌╌╌╌╌╌╌╌╌╌╌╌╌╌╌╌╌╌╌╌╌╌╌╌╌╌╌╌╌╌╌╌╌╌╌╌╌╌╌╌╌╌╌╌╌╌╌╌╌╌╌╌╌╌╌╌╌╌╌╌╌╌╌┤
│ 10 ┆ opa       ┆ 0.10.0, 0.11.0, 0.6.0, 0.7.0, 0.8.0, 0.9.0, 23.1.0, 23.11.0, 23.4.0, 23.4.1, 23.7.0             │
├╌╌╌╌┼╌╌╌╌╌╌╌╌╌╌╌┼╌╌╌╌╌╌╌╌╌╌╌╌╌╌╌╌╌╌╌╌╌╌╌╌╌╌╌╌╌╌╌╌╌╌╌╌╌╌╌╌╌╌╌╌╌╌╌╌╌╌╌╌╌╌╌╌╌╌╌╌╌╌╌╌╌╌╌╌╌╌╌╌╌╌╌╌╌╌╌╌╌╌╌╌╌╌╌╌╌╌╌╌╌╌╌╌╌┤
│ 11 ┆ secret    ┆ 0.1.0, 0.2.0, 0.3.0, 0.4.0, 0.5.0, 0.6.0, 23.1.0, 23.11.0, 23.4.0, 23.4.1, 23.7.0               │
├╌╌╌╌┼╌╌╌╌╌╌╌╌╌╌╌┼╌╌╌╌╌╌╌╌╌╌╌╌╌╌╌╌╌╌╌╌╌╌╌╌╌╌╌╌╌╌╌╌╌╌╌╌╌╌╌╌╌╌╌╌╌╌╌╌╌╌╌╌╌╌╌╌╌╌╌╌╌╌╌╌╌╌╌╌╌╌╌╌╌╌╌╌╌╌╌╌╌╌╌╌╌╌╌╌╌╌╌╌╌╌╌╌╌┤
│ 12 ┆ spark-k8s ┆ 0.1.0, 0.2.0, 0.3.0, 0.4.0, 0.5.0, 0.6.0, 23.1.0, 23.11.0, 23.4.0, 23.4.1, 23.7.0               │
├╌╌╌╌┼╌╌╌╌╌╌╌╌╌╌╌┼╌╌╌╌╌╌╌╌╌╌╌╌╌╌╌╌╌╌╌╌╌╌╌╌╌╌╌╌╌╌╌╌╌╌╌╌╌╌╌╌╌╌╌╌╌╌╌╌╌╌╌╌╌╌╌╌╌╌╌╌╌╌╌╌╌╌╌╌╌╌╌╌╌╌╌╌╌╌╌╌╌╌╌╌╌╌╌╌╌╌╌╌╌╌╌╌╌┤
│ 13 ┆ superset  ┆ 0.1.0, 0.2.0, 0.3.0, 0.4.0, 0.5.0, 0.6.0, 0.7.0, 23.1.0, 23.11.0, 23.4.0, 23.4.1, 23.7.0        │
├╌╌╌╌┼╌╌╌╌╌╌╌╌╌╌╌┼╌╌╌╌╌╌╌╌╌╌╌╌╌╌╌╌╌╌╌╌╌╌╌╌╌╌╌╌╌╌╌╌╌╌╌╌╌╌╌╌╌╌╌╌╌╌╌╌╌╌╌╌╌╌╌╌╌╌╌╌╌╌╌╌╌╌╌╌╌╌╌╌╌╌╌╌╌╌╌╌╌╌╌╌╌╌╌╌╌╌╌╌╌╌╌╌╌┤
│ 14 ┆ trino     ┆ 0.2.0, 0.3.0, 0.3.1, 0.4.0, 0.5.0, 0.6.0, 0.7.0, 0.8.0, 23.1.0, 23.11.0, 23.4.0, 23.4.1, 23.7.0 │
├╌╌╌╌┼╌╌╌╌╌╌╌╌╌╌╌┼╌╌╌╌╌╌╌╌╌╌╌╌╌╌╌╌╌╌╌╌╌╌╌╌╌╌╌╌╌╌╌╌╌╌╌╌╌╌╌╌╌╌╌╌╌╌╌╌╌╌╌╌╌╌╌╌╌╌╌╌╌╌╌╌╌╌╌╌╌╌╌╌╌╌╌╌╌╌╌╌╌╌╌╌╌╌╌╌╌╌╌╌╌╌╌╌╌┤
│ 15 ┆ zookeeper ┆ 0.10.0, 0.11.0, 0.12.0, 0.6.0, 0.7.0, 0.8.0, 0.9.0, 23.1.0, 23.11.0, 23.4.0, 23.4.1, 23.7.0     │
└────┴───────────┴─────────────────────────────────────────────────────────────────────────────────────────────────┘

# 제공 스택
stackablectl stack list
---
┌────┬────────────────────────────────────┬─────────┬─────────────────────────────────────────────────────────────────────────────────────────────────────────────────┐
│ #  ┆ STACK                              ┆ RELEASE ┆ DESCRIPTION                                                                                                     │
╞════╪════════════════════════════════════╪═════════╪═════════════════════════════════════════════════════════════════════════════════════════════════════════════════╡
│ 1  ┆ monitoring                         ┆ 23.7    ┆ Stack containing Prometheus and Grafana                                                                         │
├╌╌╌╌┼╌╌╌╌╌╌╌╌╌╌╌╌╌╌╌╌╌╌╌╌╌╌╌╌╌╌╌╌╌╌╌╌╌╌╌╌┼╌╌╌╌╌╌╌╌╌┼╌╌╌╌╌╌╌╌╌╌╌╌╌╌╌╌╌╌╌╌╌╌╌╌╌╌╌╌╌╌╌╌╌╌╌╌╌╌╌╌╌╌╌╌╌╌╌╌╌╌╌╌╌╌╌╌╌╌╌╌╌╌╌╌╌╌╌╌╌╌╌╌╌╌╌╌╌╌╌╌╌╌╌╌╌╌╌╌╌╌╌╌╌╌╌╌╌╌╌╌╌╌╌╌╌╌╌╌╌╌╌╌╌┤
│ 2  ┆ logging                            ┆ 23.7    ┆ Stack containing OpenSearch, OpenSearch Dashboards (Kibana) and Vector aggregator                               │
├╌╌╌╌┼╌╌╌╌╌╌╌╌╌╌╌╌╌╌╌╌╌╌╌╌╌╌╌╌╌╌╌╌╌╌╌╌╌╌╌╌┼╌╌╌╌╌╌╌╌╌┼╌╌╌╌╌╌╌╌╌╌╌╌╌╌╌╌╌╌╌╌╌╌╌╌╌╌╌╌╌╌╌╌╌╌╌╌╌╌╌╌╌╌╌╌╌╌╌╌╌╌╌╌╌╌╌╌╌╌╌╌╌╌╌╌╌╌╌╌╌╌╌╌╌╌╌╌╌╌╌╌╌╌╌╌╌╌╌╌╌╌╌╌╌╌╌╌╌╌╌╌╌╌╌╌╌╌╌╌╌╌╌╌╌┤
│ 3  ┆ airflow                            ┆ 23.7    ┆ Stack containing Airflow scheduling platform                                                                    │
├╌╌╌╌┼╌╌╌╌╌╌╌╌╌╌╌╌╌╌╌╌╌╌╌╌╌╌╌╌╌╌╌╌╌╌╌╌╌╌╌╌┼╌╌╌╌╌╌╌╌╌┼╌╌╌╌╌╌╌╌╌╌╌╌╌╌╌╌╌╌╌╌╌╌╌╌╌╌╌╌╌╌╌╌╌╌╌╌╌╌╌╌╌╌╌╌╌╌╌╌╌╌╌╌╌╌╌╌╌╌╌╌╌╌╌╌╌╌╌╌╌╌╌╌╌╌╌╌╌╌╌╌╌╌╌╌╌╌╌╌╌╌╌╌╌╌╌╌╌╌╌╌╌╌╌╌╌╌╌╌╌╌╌╌╌┤
│ 4  ┆ data-lakehouse-iceberg-trino-spark ┆ 23.7    ┆ Data lakehouse using Iceberg lakehouse on S3, Trino as query engine, Spark for streaming ingest and Superset    │
│    ┆                                    ┆         ┆ for data visualization                                                                                          │
├╌╌╌╌┼╌╌╌╌╌╌╌╌╌╌╌╌╌╌╌╌╌╌╌╌╌╌╌╌╌╌╌╌╌╌╌╌╌╌╌╌┼╌╌╌╌╌╌╌╌╌┼╌╌╌╌╌╌╌╌╌╌╌╌╌╌╌╌╌╌╌╌╌╌╌╌╌╌╌╌╌╌╌╌╌╌╌╌╌╌╌╌╌╌╌╌╌╌╌╌╌╌╌╌╌╌╌╌╌╌╌╌╌╌╌╌╌╌╌╌╌╌╌╌╌╌╌╌╌╌╌╌╌╌╌╌╌╌╌╌╌╌╌╌╌╌╌╌╌╌╌╌╌╌╌╌╌╌╌╌╌╌╌╌╌┤
│ 5  ┆ hdfs-hbase                         ┆ 23.7    ┆ HBase cluster using HDFS as underlying storage                                                                  │
├╌╌╌╌┼╌╌╌╌╌╌╌╌╌╌╌╌╌╌╌╌╌╌╌╌╌╌╌╌╌╌╌╌╌╌╌╌╌╌╌╌┼╌╌╌╌╌╌╌╌╌┼╌╌╌╌╌╌╌╌╌╌╌╌╌╌╌╌╌╌╌╌╌╌╌╌╌╌╌╌╌╌╌╌╌╌╌╌╌╌╌╌╌╌╌╌╌╌╌╌╌╌╌╌╌╌╌╌╌╌╌╌╌╌╌╌╌╌╌╌╌╌╌╌╌╌╌╌╌╌╌╌╌╌╌╌╌╌╌╌╌╌╌╌╌╌╌╌╌╌╌╌╌╌╌╌╌╌╌╌╌╌╌╌╌┤
│ 6  ┆ nifi-kafka-druid-superset-s3       ┆ 23.7    ┆ Stack containing NiFi, Kafka, Druid, MinIO and Superset for data visualization                                  │
├╌╌╌╌┼╌╌╌╌╌╌╌╌╌╌╌╌╌╌╌╌╌╌╌╌╌╌╌╌╌╌╌╌╌╌╌╌╌╌╌╌┼╌╌╌╌╌╌╌╌╌┼╌╌╌╌╌╌╌╌╌╌╌╌╌╌╌╌╌╌╌╌╌╌╌╌╌╌╌╌╌╌╌╌╌╌╌╌╌╌╌╌╌╌╌╌╌╌╌╌╌╌╌╌╌╌╌╌╌╌╌╌╌╌╌╌╌╌╌╌╌╌╌╌╌╌╌╌╌╌╌╌╌╌╌╌╌╌╌╌╌╌╌╌╌╌╌╌╌╌╌╌╌╌╌╌╌╌╌╌╌╌╌╌╌┤
│ 7  ┆ spark-trino-superset-s3            ┆ 23.7    ┆ Stack containing MinIO, Trino and Superset for data visualization                                               │
├╌╌╌╌┼╌╌╌╌╌╌╌╌╌╌╌╌╌╌╌╌╌╌╌╌╌╌╌╌╌╌╌╌╌╌╌╌╌╌╌╌┼╌╌╌╌╌╌╌╌╌┼╌╌╌╌╌╌╌╌╌╌╌╌╌╌╌╌╌╌╌╌╌╌╌╌╌╌╌╌╌╌╌╌╌╌╌╌╌╌╌╌╌╌╌╌╌╌╌╌╌╌╌╌╌╌╌╌╌╌╌╌╌╌╌╌╌╌╌╌╌╌╌╌╌╌╌╌╌╌╌╌╌╌╌╌╌╌╌╌╌╌╌╌╌╌╌╌╌╌╌╌╌╌╌╌╌╌╌╌╌╌╌╌╌┤
│ 8  ┆ trino-superset-s3                  ┆ 23.7    ┆ Stack containing MinIO, Trino and Superset for data visualization                                               │
├╌╌╌╌┼╌╌╌╌╌╌╌╌╌╌╌╌╌╌╌╌╌╌╌╌╌╌╌╌╌╌╌╌╌╌╌╌╌╌╌╌┼╌╌╌╌╌╌╌╌╌┼╌╌╌╌╌╌╌╌╌╌╌╌╌╌╌╌╌╌╌╌╌╌╌╌╌╌╌╌╌╌╌╌╌╌╌╌╌╌╌╌╌╌╌╌╌╌╌╌╌╌╌╌╌╌╌╌╌╌╌╌╌╌╌╌╌╌╌╌╌╌╌╌╌╌╌╌╌╌╌╌╌╌╌╌╌╌╌╌╌╌╌╌╌╌╌╌╌╌╌╌╌╌╌╌╌╌╌╌╌╌╌╌╌┤
│ 9  ┆ trino-iceberg                      ┆ 23.7    ┆ Stack containing Trino using Apache Iceberg as a S3 data lakehouse                                              │
├╌╌╌╌┼╌╌╌╌╌╌╌╌╌╌╌╌╌╌╌╌╌╌╌╌╌╌╌╌╌╌╌╌╌╌╌╌╌╌╌╌┼╌╌╌╌╌╌╌╌╌┼╌╌╌╌╌╌╌╌╌╌╌╌╌╌╌╌╌╌╌╌╌╌╌╌╌╌╌╌╌╌╌╌╌╌╌╌╌╌╌╌╌╌╌╌╌╌╌╌╌╌╌╌╌╌╌╌╌╌╌╌╌╌╌╌╌╌╌╌╌╌╌╌╌╌╌╌╌╌╌╌╌╌╌╌╌╌╌╌╌╌╌╌╌╌╌╌╌╌╌╌╌╌╌╌╌╌╌╌╌╌╌╌╌┤
│ 10 ┆ jupyterhub-pyspark-hdfs            ┆ 23.7    ┆ Jupyterhub with PySpark and HDFS integration                                                                    │
├╌╌╌╌┼╌╌╌╌╌╌╌╌╌╌╌╌╌╌╌╌╌╌╌╌╌╌╌╌╌╌╌╌╌╌╌╌╌╌╌╌┼╌╌╌╌╌╌╌╌╌┼╌╌╌╌╌╌╌╌╌╌╌╌╌╌╌╌╌╌╌╌╌╌╌╌╌╌╌╌╌╌╌╌╌╌╌╌╌╌╌╌╌╌╌╌╌╌╌╌╌╌╌╌╌╌╌╌╌╌╌╌╌╌╌╌╌╌╌╌╌╌╌╌╌╌╌╌╌╌╌╌╌╌╌╌╌╌╌╌╌╌╌╌╌╌╌╌╌╌╌╌╌╌╌╌╌╌╌╌╌╌╌╌╌┤
│ 11 ┆ dual-hive-hdfs-s3                  ┆ 23.7    ┆ Dual stack Hive on HDFS and S3 for Hadoop/Hive to Trino migration                                               │
├╌╌╌╌┼╌╌╌╌╌╌╌╌╌╌╌╌╌╌╌╌╌╌╌╌╌╌╌╌╌╌╌╌╌╌╌╌╌╌╌╌┼╌╌╌╌╌╌╌╌╌┼╌╌╌╌╌╌╌╌╌╌╌╌╌╌╌╌╌╌╌╌╌╌╌╌╌╌╌╌╌╌╌╌╌╌╌╌╌╌╌╌╌╌╌╌╌╌╌╌╌╌╌╌╌╌╌╌╌╌╌╌╌╌╌╌╌╌╌╌╌╌╌╌╌╌╌╌╌╌╌╌╌╌╌╌╌╌╌╌╌╌╌╌╌╌╌╌╌╌╌╌╌╌╌╌╌╌╌╌╌╌╌╌╌┤
│ 12 ┆ tutorial-openldap                  ┆ 23.7    ┆ An OpenLDAP instance with two users (alice:alice, bob:bob) and TLS enabled. The bind user credentials are:      │
│    ┆                                    ┆         ┆ ldapadmin:ldapadminpassword. No AuthenticationClass is configured, The AuthenticationClass is created manually  │
│    ┆                                    ┆         ┆ in the tutorial. Use the 'openldap' Stack for an OpenLDAD with an AuthenticationClass already installed.        │
├╌╌╌╌┼╌╌╌╌╌╌╌╌╌╌╌╌╌╌╌╌╌╌╌╌╌╌╌╌╌╌╌╌╌╌╌╌╌╌╌╌┼╌╌╌╌╌╌╌╌╌┼╌╌╌╌╌╌╌╌╌╌╌╌╌╌╌╌╌╌╌╌╌╌╌╌╌╌╌╌╌╌╌╌╌╌╌╌╌╌╌╌╌╌╌╌╌╌╌╌╌╌╌╌╌╌╌╌╌╌╌╌╌╌╌╌╌╌╌╌╌╌╌╌╌╌╌╌╌╌╌╌╌╌╌╌╌╌╌╌╌╌╌╌╌╌╌╌╌╌╌╌╌╌╌╌╌╌╌╌╌╌╌╌╌┤
│ 13 ┆ openldap                           ┆ 23.7    ┆ An OpenLDAP instance with two users (alice:alice, bob:bob) and TLS enabled. The bind user credentials are:      │
│    ┆                                    ┆         ┆ ldapadmin:ldapadminpassword. The LDAP AuthenticationClass is called 'ldap' and the SecretClass for the bind     │
│    ┆                                    ┆         ┆ credentials is called 'ldap-bind-credentials'. The stack already creates an appropriate Secret, so referring to │
│    ┆                                    ┆         ┆ the 'ldap' AuthenticationClass in your ProductCluster should be enough.                                         │
├╌╌╌╌┼╌╌╌╌╌╌╌╌╌╌╌╌╌╌╌╌╌╌╌╌╌╌╌╌╌╌╌╌╌╌╌╌╌╌╌╌┼╌╌╌╌╌╌╌╌╌┼╌╌╌╌╌╌╌╌╌╌╌╌╌╌╌╌╌╌╌╌╌╌╌╌╌╌╌╌╌╌╌╌╌╌╌╌╌╌╌╌╌╌╌╌╌╌╌╌╌╌╌╌╌╌╌╌╌╌╌╌╌╌╌╌╌╌╌╌╌╌╌╌╌╌╌╌╌╌╌╌╌╌╌╌╌╌╌╌╌╌╌╌╌╌╌╌╌╌╌╌╌╌╌╌╌╌╌╌╌╌╌╌╌┤
│ 14 ┆ keycloak-opa-poc                   ┆ 23.7    ┆ A Superset, Trino, Druid, Keycloak and OPA instance. Superset, Trino and Druid have single sign-on with         │
│    ┆                                    ┆         ┆ Keycloak enabled. Trino and Druid have OPA authorization enabled. 3 users are created in Keycloak:              │
│    ┆                                    ┆         ┆ admin:adminadmin, alice:alicealice, bob:bobbob. admin and alice are admins with full authorization in Druid and │
│    ┆                                    ┆         ┆ Trino, bob is not authorized. This is a proof-of-concept and the mechanisms used here are subject to change.    │
├╌╌╌╌┼╌╌╌╌╌╌╌╌╌╌╌╌╌╌╌╌╌╌╌╌╌╌╌╌╌╌╌╌╌╌╌╌╌╌╌╌┼╌╌╌╌╌╌╌╌╌┼╌╌╌╌╌╌╌╌╌╌╌╌╌╌╌╌╌╌╌╌╌╌╌╌╌╌╌╌╌╌╌╌╌╌╌╌╌╌╌╌╌╌╌╌╌╌╌╌╌╌╌╌╌╌╌╌╌╌╌╌╌╌╌╌╌╌╌╌╌╌╌╌╌╌╌╌╌╌╌╌╌╌╌╌╌╌╌╌╌╌╌╌╌╌╌╌╌╌╌╌╌╌╌╌╌╌╌╌╌╌╌╌╌┤
│ 15 ┆ signal-processing                  ┆ 23.7    ┆ A stack used for creating, streaming and processing in-flight data and persisting it to TimescaleDB before it   │
│    ┆                                    ┆         ┆ is displayed in Grafana                                                                                         │
└────┴────────────────────────────────────┴─────────┴─────────────────────────────────────────────────────────────────────────────────────────────────────────────────┘

# 제공 데모 : Stackable release 설치 > 스택 구성 > 데이터 구성
stackablectl demo list
---
┌────┬─────────────────────────────────────────────────────┬────────────────────────────────────┬─────────────────────────────────────────────────────────────────────┐
│ #  ┆ NAME                                                ┆ STACK                              ┆ DESCRIPTION                                                         │
╞════╪═════════════════════════════════════════════════════╪════════════════════════════════════╪═════════════════════════════════════════════════════════════════════╡
│ 1  ┆ airflow-scheduled-job                               ┆ airflow                            ┆ Activate a simple Airflow DAG to run continuously at a set interval │
├╌╌╌╌┼╌╌╌╌╌╌╌╌╌╌╌╌╌╌╌╌╌╌╌╌╌╌╌╌╌╌╌╌╌╌╌╌╌╌╌╌╌╌╌╌╌╌╌╌╌╌╌╌╌╌╌╌╌┼╌╌╌╌╌╌╌╌╌╌╌╌╌╌╌╌╌╌╌╌╌╌╌╌╌╌╌╌╌╌╌╌╌╌╌╌┼╌╌╌╌╌╌╌╌╌╌╌╌╌╌╌╌╌╌╌╌╌╌╌╌╌╌╌╌╌╌╌╌╌╌╌╌╌╌╌╌╌╌╌╌╌╌╌╌╌╌╌╌╌╌╌╌╌╌╌╌╌╌╌╌╌╌╌╌╌┤
│ 2  ┆ hbase-hdfs-load-cycling-data                        ┆ hdfs-hbase                         ┆ Copy data from S3 bucket to an HBase table                          │
├╌╌╌╌┼╌╌╌╌╌╌╌╌╌╌╌╌╌╌╌╌╌╌╌╌╌╌╌╌╌╌╌╌╌╌╌╌╌╌╌╌╌╌╌╌╌╌╌╌╌╌╌╌╌╌╌╌╌┼╌╌╌╌╌╌╌╌╌╌╌╌╌╌╌╌╌╌╌╌╌╌╌╌╌╌╌╌╌╌╌╌╌╌╌╌┼╌╌╌╌╌╌╌╌╌╌╌╌╌╌╌╌╌╌╌╌╌╌╌╌╌╌╌╌╌╌╌╌╌╌╌╌╌╌╌╌╌╌╌╌╌╌╌╌╌╌╌╌╌╌╌╌╌╌╌╌╌╌╌╌╌╌╌╌╌┤
│ 3  ┆ nifi-kafka-druid-earthquake-data                    ┆ nifi-kafka-druid-superset-s3       ┆ Demo ingesting earthquake data into Kafka using NiFi, streaming it  │
│    ┆                                                     ┆                                    ┆ into Druid and creating a Superset dashboard                        │
├╌╌╌╌┼╌╌╌╌╌╌╌╌╌╌╌╌╌╌╌╌╌╌╌╌╌╌╌╌╌╌╌╌╌╌╌╌╌╌╌╌╌╌╌╌╌╌╌╌╌╌╌╌╌╌╌╌╌┼╌╌╌╌╌╌╌╌╌╌╌╌╌╌╌╌╌╌╌╌╌╌╌╌╌╌╌╌╌╌╌╌╌╌╌╌┼╌╌╌╌╌╌╌╌╌╌╌╌╌╌╌╌╌╌╌╌╌╌╌╌╌╌╌╌╌╌╌╌╌╌╌╌╌╌╌╌╌╌╌╌╌╌╌╌╌╌╌╌╌╌╌╌╌╌╌╌╌╌╌╌╌╌╌╌╌┤
│ 4  ┆ nifi-kafka-druid-water-level-data                   ┆ nifi-kafka-druid-superset-s3       ┆ Demo ingesting water level data into Kafka using NiFi, streaming it │
│    ┆                                                     ┆                                    ┆ into Druid and creating a Superset dashboard                        │
├╌╌╌╌┼╌╌╌╌╌╌╌╌╌╌╌╌╌╌╌╌╌╌╌╌╌╌╌╌╌╌╌╌╌╌╌╌╌╌╌╌╌╌╌╌╌╌╌╌╌╌╌╌╌╌╌╌╌┼╌╌╌╌╌╌╌╌╌╌╌╌╌╌╌╌╌╌╌╌╌╌╌╌╌╌╌╌╌╌╌╌╌╌╌╌┼╌╌╌╌╌╌╌╌╌╌╌╌╌╌╌╌╌╌╌╌╌╌╌╌╌╌╌╌╌╌╌╌╌╌╌╌╌╌╌╌╌╌╌╌╌╌╌╌╌╌╌╌╌╌╌╌╌╌╌╌╌╌╌╌╌╌╌╌╌┤
│ 5  ┆ spark-k8s-anomaly-detection-taxi-data               ┆ spark-trino-superset-s3            ┆ Demo loading New York taxi data into an S3 bucket and carrying out  │
│    ┆                                                     ┆                                    ┆ an anomaly detection analysis on it                                 │
├╌╌╌╌┼╌╌╌╌╌╌╌╌╌╌╌╌╌╌╌╌╌╌╌╌╌╌╌╌╌╌╌╌╌╌╌╌╌╌╌╌╌╌╌╌╌╌╌╌╌╌╌╌╌╌╌╌╌┼╌╌╌╌╌╌╌╌╌╌╌╌╌╌╌╌╌╌╌╌╌╌╌╌╌╌╌╌╌╌╌╌╌╌╌╌┼╌╌╌╌╌╌╌╌╌╌╌╌╌╌╌╌╌╌╌╌╌╌╌╌╌╌╌╌╌╌╌╌╌╌╌╌╌╌╌╌╌╌╌╌╌╌╌╌╌╌╌╌╌╌╌╌╌╌╌╌╌╌╌╌╌╌╌╌╌┤
│ 6  ┆ trino-iceberg                                       ┆ trino-iceberg                      ┆ Demo containing Trino using Apache Iceberg as a S3 data lakehouse   │
├╌╌╌╌┼╌╌╌╌╌╌╌╌╌╌╌╌╌╌╌╌╌╌╌╌╌╌╌╌╌╌╌╌╌╌╌╌╌╌╌╌╌╌╌╌╌╌╌╌╌╌╌╌╌╌╌╌╌┼╌╌╌╌╌╌╌╌╌╌╌╌╌╌╌╌╌╌╌╌╌╌╌╌╌╌╌╌╌╌╌╌╌╌╌╌┼╌╌╌╌╌╌╌╌╌╌╌╌╌╌╌╌╌╌╌╌╌╌╌╌╌╌╌╌╌╌╌╌╌╌╌╌╌╌╌╌╌╌╌╌╌╌╌╌╌╌╌╌╌╌╌╌╌╌╌╌╌╌╌╌╌╌╌╌╌┤
│ 7  ┆ trino-taxi-data                                     ┆ trino-superset-s3                  ┆ Demo loading 2.5 years of New York taxi data into S3 bucket,        │
│    ┆                                                     ┆                                    ┆ creating a Trino table and a Superset dashboard                     │
├╌╌╌╌┼╌╌╌╌╌╌╌╌╌╌╌╌╌╌╌╌╌╌╌╌╌╌╌╌╌╌╌╌╌╌╌╌╌╌╌╌╌╌╌╌╌╌╌╌╌╌╌╌╌╌╌╌╌┼╌╌╌╌╌╌╌╌╌╌╌╌╌╌╌╌╌╌╌╌╌╌╌╌╌╌╌╌╌╌╌╌╌╌╌╌┼╌╌╌╌╌╌╌╌╌╌╌╌╌╌╌╌╌╌╌╌╌╌╌╌╌╌╌╌╌╌╌╌╌╌╌╌╌╌╌╌╌╌╌╌╌╌╌╌╌╌╌╌╌╌╌╌╌╌╌╌╌╌╌╌╌╌╌╌╌┤
│ 8  ┆ data-lakehouse-iceberg-trino-spark                  ┆ data-lakehouse-iceberg-trino-spark ┆ Data lakehouse using Iceberg lakehouse on S3, Trino as query        │
│    ┆                                                     ┆                                    ┆ engine, Spark for streaming ingest and Superset for data            │
│    ┆                                                     ┆                                    ┆ visualization. Multiple datasources like taxi data, water levels in │
│    ┆                                                     ┆                                    ┆ Germany, earthquakes, e-charging stations and more are loaded.      │
├╌╌╌╌┼╌╌╌╌╌╌╌╌╌╌╌╌╌╌╌╌╌╌╌╌╌╌╌╌╌╌╌╌╌╌╌╌╌╌╌╌╌╌╌╌╌╌╌╌╌╌╌╌╌╌╌╌╌┼╌╌╌╌╌╌╌╌╌╌╌╌╌╌╌╌╌╌╌╌╌╌╌╌╌╌╌╌╌╌╌╌╌╌╌╌┼╌╌╌╌╌╌╌╌╌╌╌╌╌╌╌╌╌╌╌╌╌╌╌╌╌╌╌╌╌╌╌╌╌╌╌╌╌╌╌╌╌╌╌╌╌╌╌╌╌╌╌╌╌╌╌╌╌╌╌╌╌╌╌╌╌╌╌╌╌┤
│ 9  ┆ jupyterhub-pyspark-hdfs-anomaly-detection-taxi-data ┆ jupyterhub-pyspark-hdfs            ┆ Jupyterhub with PySpark and HDFS integration                        │
├╌╌╌╌┼╌╌╌╌╌╌╌╌╌╌╌╌╌╌╌╌╌╌╌╌╌╌╌╌╌╌╌╌╌╌╌╌╌╌╌╌╌╌╌╌╌╌╌╌╌╌╌╌╌╌╌╌╌┼╌╌╌╌╌╌╌╌╌╌╌╌╌╌╌╌╌╌╌╌╌╌╌╌╌╌╌╌╌╌╌╌╌╌╌╌┼╌╌╌╌╌╌╌╌╌╌╌╌╌╌╌╌╌╌╌╌╌╌╌╌╌╌╌╌╌╌╌╌╌╌╌╌╌╌╌╌╌╌╌╌╌╌╌╌╌╌╌╌╌╌╌╌╌╌╌╌╌╌╌╌╌╌╌╌╌┤
│ 10 ┆ logging                                             ┆ logging                            ┆ Demo showing the logging stack in action                            │
├╌╌╌╌┼╌╌╌╌╌╌╌╌╌╌╌╌╌╌╌╌╌╌╌╌╌╌╌╌╌╌╌╌╌╌╌╌╌╌╌╌╌╌╌╌╌╌╌╌╌╌╌╌╌╌╌╌╌┼╌╌╌╌╌╌╌╌╌╌╌╌╌╌╌╌╌╌╌╌╌╌╌╌╌╌╌╌╌╌╌╌╌╌╌╌┼╌╌╌╌╌╌╌╌╌╌╌╌╌╌╌╌╌╌╌╌╌╌╌╌╌╌╌╌╌╌╌╌╌╌╌╌╌╌╌╌╌╌╌╌╌╌╌╌╌╌╌╌╌╌╌╌╌╌╌╌╌╌╌╌╌╌╌╌╌┤
│ 11 ┆ signal-processing                                   ┆ signal-processing                  ┆ Demo showing signal processing on time-series data                  │
└────┴─────────────────────────────────────────────────────┴────────────────────────────────────┴─────────────────────────────────────────────────────────────────────┘
Demo: Trino
대규모 데이터 웨어하우스 시스템에서 빠른 데이터 분석을 위한 분산 SQL 쿼리 엔진. 다양한 데이터 소스에 대한 SQL 쿼리를 실행할 수 있는 능력을 가지고 있으며, 이를 통해 사용자는 하나의 시스템을 통해 여러 데이터 저장소에서 정보를 조회 가능
- 분산 아키텍처: Trino는 클러스터 환경에서 동작하며, 여러 노드에 걸쳐 데이터를 처리. 이를 통해 높은 병렬 처리 능력과 빠른 쿼리 성능을 제공
- 다양한 데이터 소스 지원: Hadoop, S3, Cassandra, Kafka, MySQL 등 다양한 데이터 소스와 호환되어 사용자가 여러 데이터 소스를 하나의 쿼리로 통합 가능
- 확장성과 유연성: Trino는 확장성이 뛰어나 대규모 데이터셋에도 효과적으로 대응할 수 있으며, 사용자의 요구에 맞게 확장하거나 조정이 가능
- 실시간 쿼리 처리: Trino는 배치 처리보다는 실시간 쿼리 처리에 초점을 맞추고 있어, 빠른 분석이 필요한 비즈니스 환경에서 유용
실습
# Demo 정보 확인
stackablectl demo describe trino-taxi-data

# [터미널] 모니터링
watch -d "kubectl get pod -n stackable-operators;echo;kubectl get pod,job,svc,pvc"

# 데모 설치 : 데이터셋 다운로드 job 포함 8분 정도 소요
stackablectl demo install trino-taxi-data

# 설치 확인
helm list -n stackable-operators
---
NAME             	NAMESPACE          	REVISION	UPDATED                                	STATUS  	CHART                   	APP VERSION
commons-operator 	stackable-operators	1       	2023-11-25 21:13:37.843332029 +0900 KST	deployed	commons-operator-23.7.0 	23.7.0
hive-operator    	stackable-operators	1       	2023-11-25 21:13:54.678512397 +0900 KST	deployed	hive-operator-23.7.0    	23.7.0
opa-operator     	stackable-operators	1       	2023-11-25 21:14:11.721549445 +0900 KST	deployed	opa-operator-23.7.0     	23.7.0
secret-operator  	stackable-operators	1       	2023-11-25 21:14:28.040685639 +0900 KST	deployed	secret-operator-23.7.0  	23.7.0
superset-operator	stackable-operators	1       	2023-11-25 21:14:56.566879755 +0900 KST	deployed	superset-operator-23.7.0	23.7.0
trino-operator   	stackable-operators	1       	2023-11-25 21:15:14.814783186 +0900 KST	deployed	trino-operator-23.7.0   	23.7.0

# taxi driver data download job 완료 확인 택시 데이터까지 받았으면 완료됨
kubectl get job
---
NAME                                 COMPLETIONS   DURATION   AGE
create-ny-taxi-data-table-in-trino   1/1           3m57s      4m20s
load-ny-taxi-data                    1/1           3m12s      4m23s
setup-superset                       1/1           79s        4m18s
superset                             1/1           73s        4m25s

# 배포 스택 정보 확인 : 바로 확인 하지 말고, 설치 완료 후 아래 확인 할 것 - Endpoint(접속 주소 정보), Conditions(상태 정보)
stackablectl stacklet list
┌──────────┬───────────────┬───────────┬──────────────────────────────────────────────────┬─────────────────────────────────┐
│ PRODUCT  ┆ NAME          ┆ NAMESPACE ┆ ENDPOINTS                                        ┆ CONDITIONS                      │
╞══════════╪═══════════════╪═══════════╪══════════════════════════════════════════════════╪═════════════════════════════════╡
│ hive     ┆ hive          ┆ default   ┆                                                  ┆ Available, Reconciling, Running │
├╌╌╌╌╌╌╌╌╌╌┼╌╌╌╌╌╌╌╌╌╌╌╌╌╌╌┼╌╌╌╌╌╌╌╌╌╌╌┼╌╌╌╌╌╌╌╌╌╌╌╌╌╌╌╌╌╌╌╌╌╌╌╌╌╌╌╌╌╌╌╌╌╌╌╌╌╌╌╌╌╌╌╌╌╌╌╌╌╌┼╌╌╌╌╌╌╌╌╌╌╌╌╌╌╌╌╌╌╌╌╌╌╌╌╌╌╌╌╌╌╌╌╌┤
│ opa      ┆ opa           ┆ default   ┆                                                  ┆ Available, Reconciling, Running │
├╌╌╌╌╌╌╌╌╌╌┼╌╌╌╌╌╌╌╌╌╌╌╌╌╌╌┼╌╌╌╌╌╌╌╌╌╌╌┼╌╌╌╌╌╌╌╌╌╌╌╌╌╌╌╌╌╌╌╌╌╌╌╌╌╌╌╌╌╌╌╌╌╌╌╌╌╌╌╌╌╌╌╌╌╌╌╌╌╌┼╌╌╌╌╌╌╌╌╌╌╌╌╌╌╌╌╌╌╌╌╌╌╌╌╌╌╌╌╌╌╌╌╌┤
│ superset ┆ superset      ┆ default   ┆ external-superset   http://3.36.15.36:31001      ┆ Available, Reconciling, Running │
├╌╌╌╌╌╌╌╌╌╌┼╌╌╌╌╌╌╌╌╌╌╌╌╌╌╌┼╌╌╌╌╌╌╌╌╌╌╌┼╌╌╌╌╌╌╌╌╌╌╌╌╌╌╌╌╌╌╌╌╌╌╌╌╌╌╌╌╌╌╌╌╌╌╌╌╌╌╌╌╌╌╌╌╌╌╌╌╌╌┼╌╌╌╌╌╌╌╌╌╌╌╌╌╌╌╌╌╌╌╌╌╌╌╌╌╌╌╌╌╌╌╌╌┤
│ trino    ┆ trino         ┆ default   ┆ coordinator-metrics 13.125.102.235:31090         ┆ Available, Reconciling, Running │
│          ┆               ┆           ┆ coordinator-https   https://13.125.102.235:32369 ┆                                 │
├╌╌╌╌╌╌╌╌╌╌┼╌╌╌╌╌╌╌╌╌╌╌╌╌╌╌┼╌╌╌╌╌╌╌╌╌╌╌┼╌╌╌╌╌╌╌╌╌╌╌╌╌╌╌╌╌╌╌╌╌╌╌╌╌╌╌╌╌╌╌╌╌╌╌╌╌╌╌╌╌╌╌╌╌╌╌╌╌╌┼╌╌╌╌╌╌╌╌╌╌╌╌╌╌╌╌╌╌╌╌╌╌╌╌╌╌╌╌╌╌╌╌╌┤
│ minio    ┆ minio-console ┆ default   ┆ http                http://15.164.211.67:30633   ┆                                 │
└──────────┴───────────────┴───────────┴──────────────────────────────────────────────────┴─────────────────────────────────┘

# 배포 스택의 product 접속 계정 정보 확인 : 대부분 admin / adminadmin 계정 정보 사용
stackablectl stacklet credentials superset superset
---
USERNAME  admin
PASSWORD  adminadmin
stackablectl stacklet credentials minio minio-console  # admin / adminadmin 계정 정보 출력 안됨
---
No credentials

# 배포 오퍼레이터 확인
stackablectl operator installed
┌───────────────────┬─────────┬─────────────────────┬──────────┬─────────────────────────────────────────┐
│ OPERATOR          ┆ VERSION ┆ NAMESPACE           ┆ STATUS   ┆ LAST UPDATED                            │
╞═══════════════════╪═════════╪═════════════════════╪══════════╪═════════════════════════════════════════╡
│ commons-operator  ┆ 23.7.0  ┆ stackable-operators ┆ deployed ┆ 2023-11-25 21:13:37.843332029 +0900 KST │
├╌╌╌╌╌╌╌╌╌╌╌╌╌╌╌╌╌╌╌┼╌╌╌╌╌╌╌╌╌┼╌╌╌╌╌╌╌╌╌╌╌╌╌╌╌╌╌╌╌╌╌┼╌╌╌╌╌╌╌╌╌╌┼╌╌╌╌╌╌╌╌╌╌╌╌╌╌╌╌╌╌╌╌╌╌╌╌╌╌╌╌╌╌╌╌╌╌╌╌╌╌╌╌╌┤
│ hive-operator     ┆ 23.7.0  ┆ stackable-operators ┆ deployed ┆ 2023-11-25 21:13:54.678512397 +0900 KST │
├╌╌╌╌╌╌╌╌╌╌╌╌╌╌╌╌╌╌╌┼╌╌╌╌╌╌╌╌╌┼╌╌╌╌╌╌╌╌╌╌╌╌╌╌╌╌╌╌╌╌╌┼╌╌╌╌╌╌╌╌╌╌┼╌╌╌╌╌╌╌╌╌╌╌╌╌╌╌╌╌╌╌╌╌╌╌╌╌╌╌╌╌╌╌╌╌╌╌╌╌╌╌╌╌┤
│ opa-operator      ┆ 23.7.0  ┆ stackable-operators ┆ deployed ┆ 2023-11-25 21:14:11.721549445 +0900 KST │
├╌╌╌╌╌╌╌╌╌╌╌╌╌╌╌╌╌╌╌┼╌╌╌╌╌╌╌╌╌┼╌╌╌╌╌╌╌╌╌╌╌╌╌╌╌╌╌╌╌╌╌┼╌╌╌╌╌╌╌╌╌╌┼╌╌╌╌╌╌╌╌╌╌╌╌╌╌╌╌╌╌╌╌╌╌╌╌╌╌╌╌╌╌╌╌╌╌╌╌╌╌╌╌╌┤
│ secret-operator   ┆ 23.7.0  ┆ stackable-operators ┆ deployed ┆ 2023-11-25 21:14:28.040685639 +0900 KST │
├╌╌╌╌╌╌╌╌╌╌╌╌╌╌╌╌╌╌╌┼╌╌╌╌╌╌╌╌╌┼╌╌╌╌╌╌╌╌╌╌╌╌╌╌╌╌╌╌╌╌╌┼╌╌╌╌╌╌╌╌╌╌┼╌╌╌╌╌╌╌╌╌╌╌╌╌╌╌╌╌╌╌╌╌╌╌╌╌╌╌╌╌╌╌╌╌╌╌╌╌╌╌╌╌┤
│ superset-operator ┆ 23.7.0  ┆ stackable-operators ┆ deployed ┆ 2023-11-25 21:14:56.566879755 +0900 KST │
├╌╌╌╌╌╌╌╌╌╌╌╌╌╌╌╌╌╌╌┼╌╌╌╌╌╌╌╌╌┼╌╌╌╌╌╌╌╌╌╌╌╌╌╌╌╌╌╌╌╌╌┼╌╌╌╌╌╌╌╌╌╌┼╌╌╌╌╌╌╌╌╌╌╌╌╌╌╌╌╌╌╌╌╌╌╌╌╌╌╌╌╌╌╌╌╌╌╌╌╌╌╌╌╌┤
│ trino-operator    ┆ 23.7.0  ┆ stackable-operators ┆ deployed ┆ 2023-11-25 21:15:14.814783186 +0900 KST │
└───────────────────┴─────────┴─────────────────────┴──────────┴─────────────────────────────────────────┘
Remote에서 접근 시 직접 endpoint 접근 할 수 있도록 Remote 환경 Ip 보안그룹에 추가(Ingress 를 사용하지 않을 경우)
NGSGID=$(aws ec2 describe-security-groups --filters Name=group-name,Values='***ng1***' --query "SecurityGroups[*].[GroupId]" --output text)
aws ec2 authorize-security-group-ingress --group-id $NGSGID --protocol '-1' **--cidr $(curl -s ipinfo.io/ip)/32**
superset, minio, trino webui 접근하기 : 위에서 stackablectl stacklet list 로 출력된 접근 정보를 이용하여 접근 id: admin password: adminadmin (전부 계정정보 동일)
Minio에 저장된 taxi 데이터
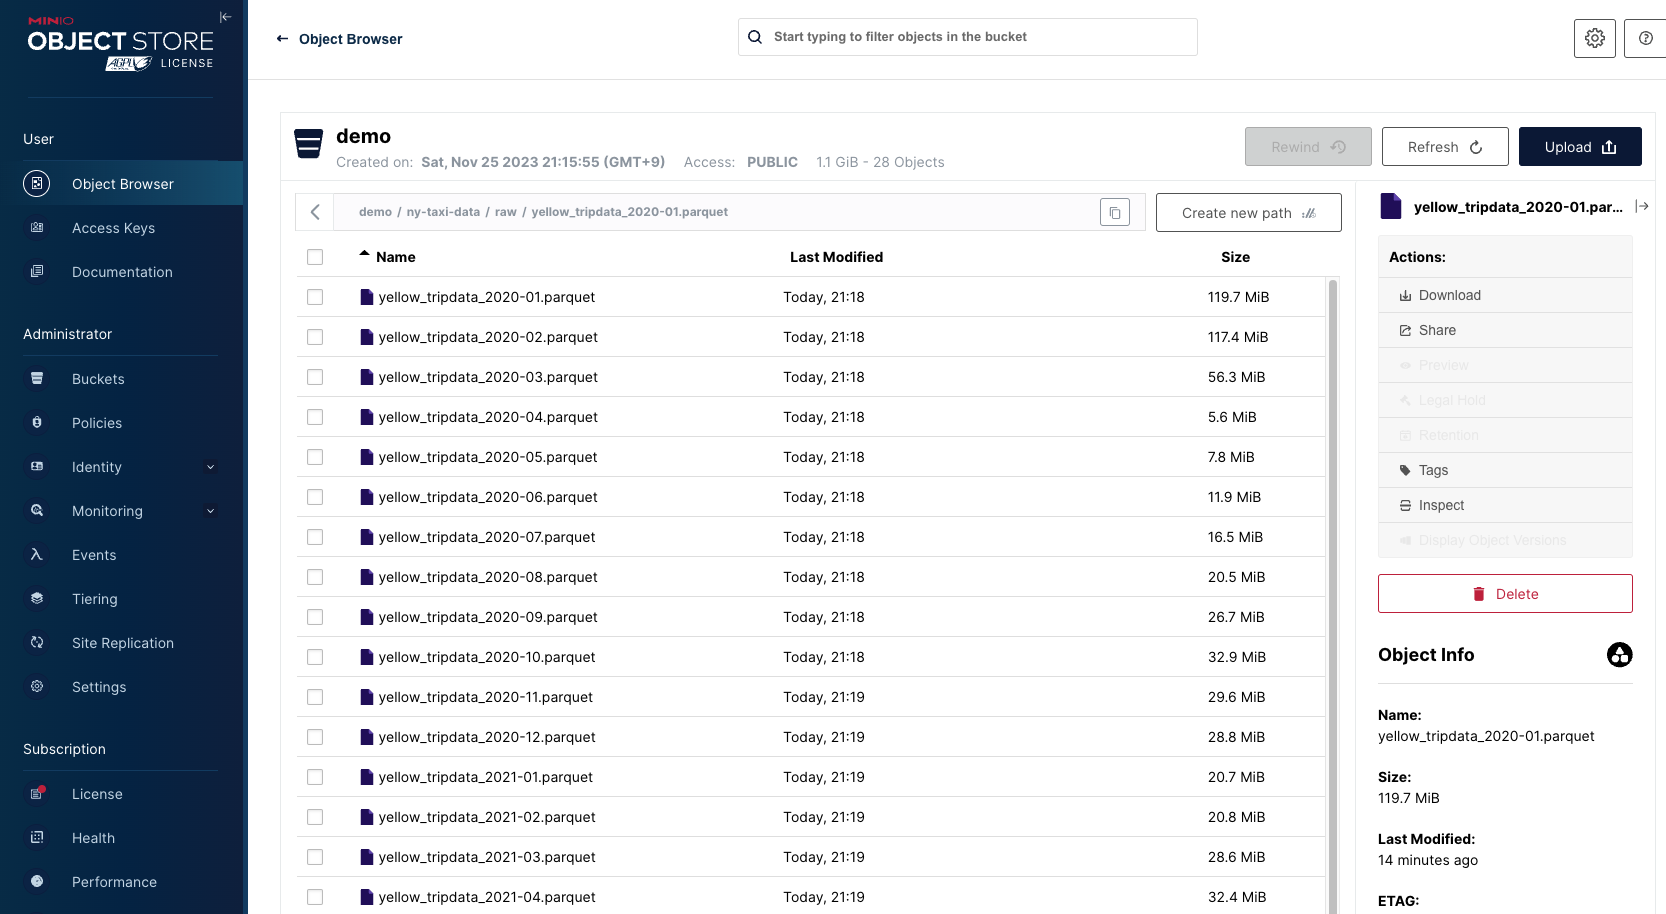
저장된 데이터 정보: 승차 및 하차 날짜/시간, 승차 및 하차 위치, 이동 거리, 항목별 요금, 요금 유형, 지불 유형 및 운전자가 보고한 승객 수
Trino
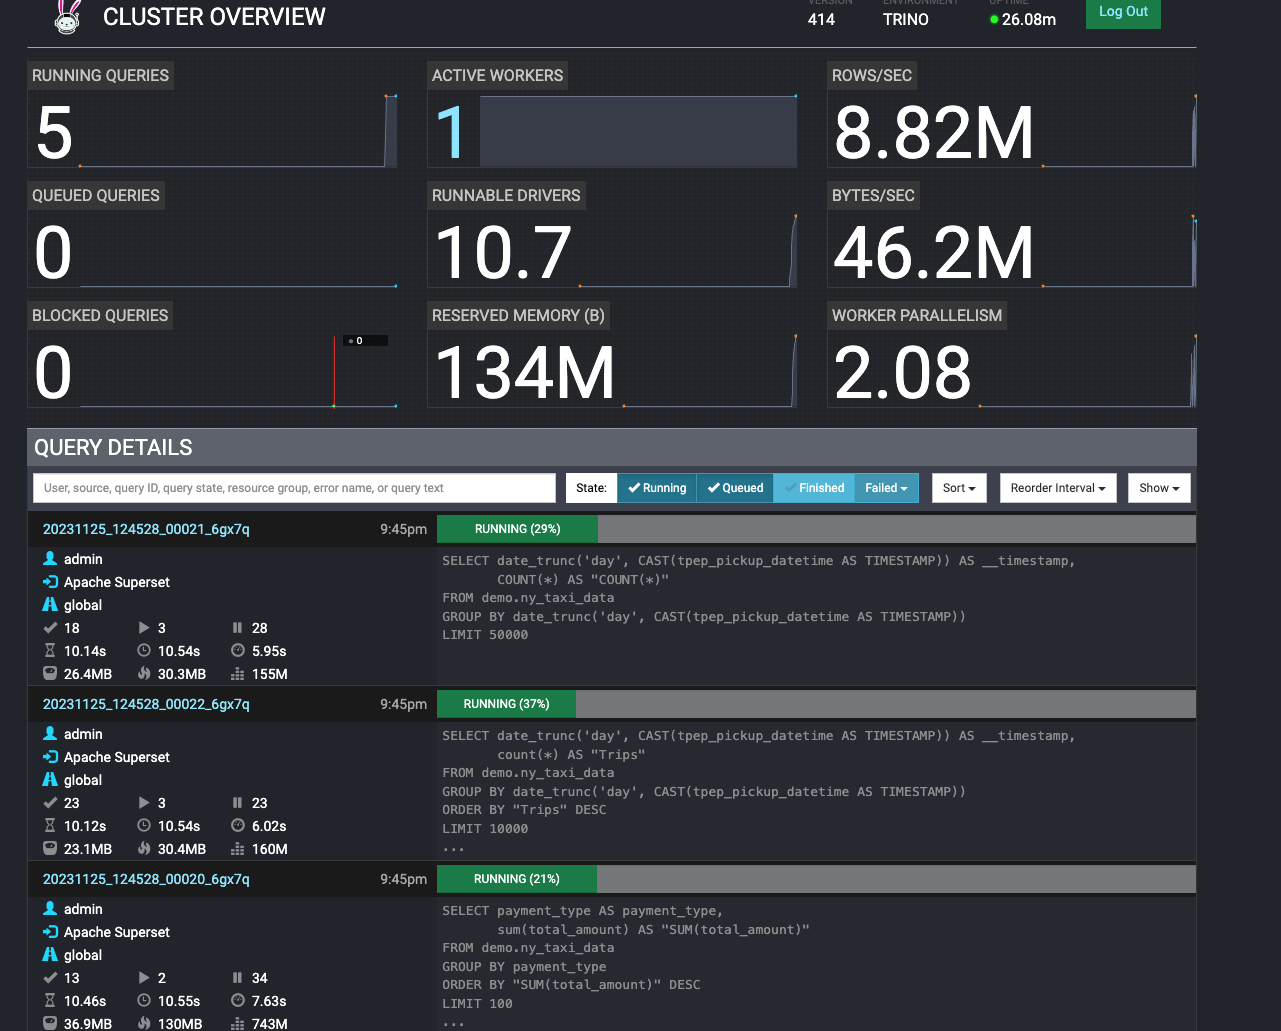
superset에서 대쉬보드 클릭하여 시각화 로드 시 trino에서 쿼리가 동작하여 데이터를 추출하는 task가 도는것을 볼 수 있다.
Superset

trino에서 추출된 데이터가 시각화되어 볼수 있다.
Trino Worker 2대로 증설
오퍼레이터로 편하게 worker 를 늘릴 수 있다. 반대로 줄이는것 도 가능.
# 로그 출력
kubectl logs -n stackable-operators -l app.kubernetes.io/instance=trino-operator -f

# trino worker 2대로 증설
kubectl get trinocluster trino -o json | cat -l json -p
kubectl patch trinocluster trino --type='json' -p='[{"op": "replace", "path": "/spec/workers/roleGroups/default/replicas", "value":2}]'

# 확인
kubectl get pod
NAME                                       READY   STATUS      RESTARTS   AGE
trino-worker-default-0                     1/1     Running     0          38m
trino-worker-default-1                     1/1     Running     0          5m12s

# 다시 줄이기
kubectl patch trinocluster trino --type='json' -p='[{"op": "replace", "path": "/spec/workers/roleGroups/default/replicas", "value":1}]'
워커노드가 2대로 늘었기에 시각화시 로드 속도도 더 빨라진다.
삭제
demo의 경우 자동 삭제가 안되므로 직접 삭제해줘야 한다.
kubectl delete supersetcluster,supersetdb superset
kubectl delete trinocluster trino && kubectl delete trinocatalog hive
kubectl delete hivecluster hive
kubectl delete s3connection minio
kubectl delete opacluster opa

# 저장소 삭제
helm uninstall postgresql-superset
helm uninstall postgresql-hive
helm uninstall minio

#
kubectl delete job --all
kubectl delete pvc --all

#
kubectl delete cm create-ny-taxi-data-table-in-trino-script setup-superset-script trino-opa-bundle
kubectl delete secret minio-s3-credentials secret-provisioner-tls-ca superset-credentials superset-mapbox-api-key trino-users
kubectl delete sa superset-sa

# operator 삭제 오퍼레이터는 자동 삭제 가능
stackablectl operator **uninstall** superset trino hive secret opa commons

# 남은 리소스 확인
kubectl get-all -n stackable-operators
데모가 아닌 Operator를 이용하여 원하는 리소스만 직접 설치하는 방법
설치
zookeeper, kafka 설치
# [터미널1] 모니터링
watch -d "kubectl get pod -n stackable-operators"

# [터미널2] 설치
stackablectl release list
┌───┬─────────┬──────────────┬─────────────────────────────────────────────────────────────────────────────┐
│ # ┆ RELEASE ┆ RELEASE DATE ┆ DESCRIPTION                                                                 │
╞═══╪═════════╪══════════════╪═════════════════════════════════════════════════════════════════════════════╡
│ 1 ┆ 23.7    ┆ 2023-07-26   ┆ Sixth release focusing on resources and pod overrides                       │
├╌╌╌┼╌╌╌╌╌╌╌╌╌┼╌╌╌╌╌╌╌╌╌╌╌╌╌╌┼╌╌╌╌╌╌╌╌╌╌╌╌╌╌╌╌╌╌╌╌╌╌╌╌╌╌╌╌╌╌╌╌╌╌╌╌╌╌╌╌╌╌╌╌╌╌╌╌╌╌╌╌╌╌╌╌╌╌╌╌╌╌╌╌╌╌╌╌╌╌╌╌╌╌╌╌╌┤

# 23.7 버전을 설치
stackablectl release install -i commons -i secret -i zookeeper -i kafka 23.7
Installed release 23.7
설치확인
# 설치 확인
helm list -n stackable-operators
---
NAME              	NAMESPACE          	REVISION	UPDATED                                	STATUS  	CHART                    	APP VERSION
commons-operator  	stackable-operators	1       	2023-11-25 22:08:54.742209744 +0900 KST	deployed	commons-operator-23.7.0  	23.7.0
kafka-operator    	stackable-operators	1       	2023-11-25 22:09:01.016951379 +0900 KST	deployed	kafka-operator-23.7.0    	23.7.0
secret-operator   	stackable-operators	1       	2023-11-25 22:09:15.285615199 +0900 KST	deployed	secret-operator-23.7.0   	23.7.0
zookeeper-operator	stackable-operators	1       	2023-11-25 22:09:19.241458599 +0900 KST	deployed	zookeeper-operator-23.7.0	23.7.0

stackablectl operator installed
---
┌────────────────────┬─────────┬─────────────────────┬──────────┬─────────────────────────────────────────┐
│ OPERATOR           ┆ VERSION ┆ NAMESPACE           ┆ STATUS   ┆ LAST UPDATED                            │
╞════════════════════╪═════════╪═════════════════════╪══════════╪═════════════════════════════════════════╡
│ commons-operator   ┆ 23.7.0  ┆ stackable-operators ┆ deployed ┆ 2023-11-25 22:08:54.742209744 +0900 KST │
├╌╌╌╌╌╌╌╌╌╌╌╌╌╌╌╌╌╌╌╌┼╌╌╌╌╌╌╌╌╌┼╌╌╌╌╌╌╌╌╌╌╌╌╌╌╌╌╌╌╌╌╌┼╌╌╌╌╌╌╌╌╌╌┼╌╌╌╌╌╌╌╌╌╌╌╌╌╌╌╌╌╌╌╌╌╌╌╌╌╌╌╌╌╌╌╌╌╌╌╌╌╌╌╌╌┤
│ kafka-operator     ┆ 23.7.0  ┆ stackable-operators ┆ deployed ┆ 2023-11-25 22:09:01.016951379 +0900 KST │
├╌╌╌╌╌╌╌╌╌╌╌╌╌╌╌╌╌╌╌╌┼╌╌╌╌╌╌╌╌╌┼╌╌╌╌╌╌╌╌╌╌╌╌╌╌╌╌╌╌╌╌╌┼╌╌╌╌╌╌╌╌╌╌┼╌╌╌╌╌╌╌╌╌╌╌╌╌╌╌╌╌╌╌╌╌╌╌╌╌╌╌╌╌╌╌╌╌╌╌╌╌╌╌╌╌┤
│ secret-operator    ┆ 23.7.0  ┆ stackable-operators ┆ deployed ┆ 2023-11-25 22:09:15.285615199 +0900 KST │
├╌╌╌╌╌╌╌╌╌╌╌╌╌╌╌╌╌╌╌╌┼╌╌╌╌╌╌╌╌╌┼╌╌╌╌╌╌╌╌╌╌╌╌╌╌╌╌╌╌╌╌╌┼╌╌╌╌╌╌╌╌╌╌┼╌╌╌╌╌╌╌╌╌╌╌╌╌╌╌╌╌╌╌╌╌╌╌╌╌╌╌╌╌╌╌╌╌╌╌╌╌╌╌╌╌┤
│ zookeeper-operator ┆ 23.7.0  ┆ stackable-operators ┆ deployed ┆ 2023-11-25 22:09:19.241458599 +0900 KST │
└────────────────────┴─────────┴─────────────────────┴──────────┴─────────────────────────────────────────┘

kubectl get crd | grep stackable.tech
---
authenticationclasses.authentication.stackable.tech   2023-11-25T12:13:35Z
druidconnections.superset.stackable.tech              2023-11-25T12:14:53Z
hiveclusters.hive.stackable.tech                      2023-11-25T12:13:52Z
kafkaclusters.kafka.stackable.tech                    2023-11-25T13:08:58Z
opaclusters.opa.stackable.tech                        2023-11-25T12:14:09Z
s3buckets.s3.stackable.tech                           2023-11-25T12:13:35Z
s3connections.s3.stackable.tech                       2023-11-25T12:13:35Z
secretclasses.secrets.stackable.tech                  2023-11-25T12:14:27Z
supersetclusters.superset.stackable.tech              2023-11-25T12:14:54Z
supersetdbs.superset.stackable.tech                   2023-11-25T12:14:53Z
trinocatalogs.trino.stackable.tech                    2023-11-25T12:15:11Z
trinoclusters.trino.stackable.tech                    2023-11-25T12:15:11Z
zookeeperclusters.zookeeper.stackable.tech            2023-11-25T13:09:16Z
zookeeperznodes.zookeeper.stackable.tech              2023-11-25T13:09:16Z
배포
Apache ZooKeeper
kubectl apply -f - <<EOF
---
apiVersion: zookeeper.stackable.tech/v1alpha1
kind: ZookeeperCluster
metadata:
  name: simple-zk
spec:
  image:
    productVersion: "3.8.1"
    stackableVersion: "23.7"
  clusterConfig:
    tls:
      serverSecretClass: null
  servers:
    roleGroups:
      primary:
        replicas: 1
        config:
          myidOffset: 10
---
apiVersion: zookeeper.stackable.tech/v1alpha1
kind: ZookeeperZnode
metadata:
  name: simple-zk-znode
spec:
  clusterRef:
    name: simple-zk
EOF

# 설치 확인
kubectl get zookeepercluster,zookeeperznode
kubectl get pod,svc,ep,pvc -l app.kubernetes.io/instance=simple-zk
kubectl describe pod -l app.kubernetes.io/instance=simple-zk
Apache Kafka
kubectl apply -f - <<EOF
---
apiVersion: kafka.stackable.tech/v1alpha1
kind: KafkaCluster
metadata:
  name: simple-kafka
spec:
  image:
    productVersion: "3.4.0"
    stackableVersion: "23.7"
  clusterConfig:
    zookeeperConfigMapName: simple-kafka-znode
    tls:
      serverSecretClass: null
  brokers:
    roleGroups:
      brokers:
        replicas: 3**
---
apiVersion: zookeeper.stackable.tech/v1alpha1
kind: ZookeeperZnode
metadata:
  name: simple-kafka-znode
spec:
  clusterRef:
    name: simple-zk
    namespace: default
EOF

# 설치 확인
kubectl get kafkacluster,zookeeperznode
kubectl get pod,svc,ep,pvc -l app.kubernetes.io/instance=simple-kafka
kubectl describe pod -l app.kubernetes.io/instance=simple-kafka
Kafka UI
helm repo add kafka-ui https://provectus.github.io/kafka-ui-charts
cat <<EOF > kafkaui-values.yml
yamlApplicationConfig:
  kafka:
    clusters:
      - name: yaml
        bootstrapServers: simple-kafka-broker-brokers:9092
  auth:
    type: disabled
  management:
    health:
      ldap:
        enabled: false
EOF

# 설치
helm install kafka-ui kafka-ui/kafka-ui **-f** kafkaui-values.yml

# 접속 확인
kubectl patch svc kafka-ui -p '{"spec":{"type":"LoadBalancer"}}'
kubectl annotate service kafka-ui "external-dns.alpha.kubernetes.io/hostname=kafka-ui.$MyDomain"
echo -e "kafka-ui Web URL = http://kafka-ui.$MyDomain"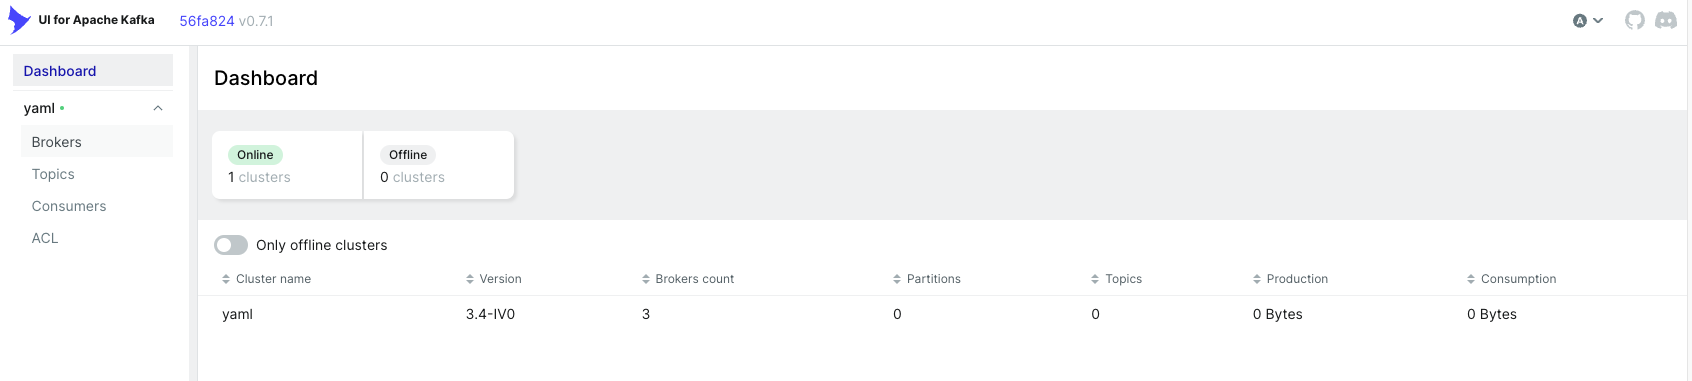
'스터디 > [gasida] 쿠버네티스 데이터베이스 오퍼레이터' 카테고리의 다른 글
| 쿠버네티스 데이터베이스 오퍼레이터 5주차 (0) | 2025.12.05 |
|---|---|
| 쿠버네티스 데이터베이스 오퍼레이터 - 4주차 (0) | 2025.12.05 |
| 쿠버네티스 데이터베이스 오퍼레이터 - 3주차 (0) | 2025.12.05 |
| 쿠버네티스 데이터베이스 오퍼레이터 - 2주차 (0) | 2025.12.05 |
| 쿠버네티스 데이터베이스 오퍼레이터 - 1주차 (0) | 2025.12.05 |